Thursday, October 11, 2012

Friday Night Bites | Roasted Tomato Burrata Crostini


Hard to believe that it was a week ago that I debuted my new seriesFriday Night Bites.  Time just goes by way too fast.   I am excited to share my second installment of this fun series.  A Crostini is one of my all time favorite appetizers.  With the pure simplicity and endless possibilities of toppings, it is the perfect appetizer.  A two to three bite wonder.

If you are busy person like me and work 50 to 60 hours per week, a Crostini is a simple appetizer that you can throw together in no time.  You can almost shop your refrigerator and pantry to come up with a creative Crostini. 


Last Friday we ended up having guests join us for our tradition.  We enjoyed a cheese platter and multiple bottles of wine.  It was an impromptu gathering, so I shopped the refrigerator and pantry for the cheese platter ingredients.  I realized later that I had all of the ingredients for this Roasted Tomato Burrata Crostini but with my time constraints getting home late from work and the guests had already arrived, it would not have been feasible.  I did however make it over the weekend and enjoyed each bite.

A few months ago I attended the SF Chefs event in San Francisco and went to the Sommeliers Blind Tasting Seminar.  Essentially there were three master sommeliers at the front of the class who evaluated each wine and put their best guess out to the group.  My friend and I would guess along with them and actually correctly identified 5 out of 6 of the wines.  I have to admit that my friend is in the wine business but I was holding my own.  Smile.


One of the wines that we tasted was Nipozzano Riserva Chianit Rufina DOCG 2008 from Castello di Nipozzano.  With the Italian flair of the Crostini, I thought this wine would be a perfect pairing.  It hosts a deep purplish color.  The nose envokes scents of sour cherry, raspberry and dried plum.  Next you experience an aroma of black pepper, vanilla, cocoa powder and espresso bean.  The finish is smooth and endless and extremely well balanced.  A winning choice!

Hope that you enjoy this Friday Night Bite and wine pairing!


Roasted Tomato Burrata Crostini

Makes 12

Baguette, 12 half inch slices
Olive oil
Salt
Pepper
2 Garlic cloves
Pesto (see recipe below or use store bought)
12 Grape tomatoes

Roasted Tomatoes

Preheat the oven to 350 degrees.

Cut each grape tomato in half and place onto a baking sheet cut side up.  Drizzle with olive oil and sprinkle with salt and pepper.  Bake for about 20 to 30 minutes.  Remove and let cool.

Crostini

To make the Crostini, slice the baguette into 12 slices that are about ½ inch thick.  Brush each side with olive oil.  Place onto a cookie sheet and bake for about 10 minutes at 350 degrees.  Check to make sure they do not get too dark.  Should be golden brown on both sides.  Flip at 5 minutes to ensure even cooking.  Remove from the oven and rub the raw garlic clove on the top of each Crostini.

Assembly

To assemble cut about a tablespoon of the burrata and spread onto each Crostini.  Next spoon about 1 to 2 teaspoons of pesto on top of the burrata.  Add 2 of the tomato halves on top of the pesto.  Sprinkle with a touch of salt.  Serve immediately and enjoy!!

Basil Pesto Sauce

2 C. Fresh basil leaves, packed tightly
½ C. Parmesan cheese, freshly grated
1/3 C. Pine nuts, toasted
½ C. Olive oil
3 Garlic cloves, smashed
Salt and pepper to taste

Use a food processor to make this sauce. Simply add the basil leaves, parmesan cheese, pine nuts and garlic cloves. Pulse for 10 seconds and then slowly pour the olive oil into the mixture while food processor is on. Continue to pulse until the mixture is smooth. Taste and then season with salt and pepper. Place into an airtight container immediately so the bright green color remains. Refrigerate until ready to use.


Sunday, October 7, 2012

Garlic, Thyme & Parmesan Popcorn


Yesterday was a great day. 

My Dad was finally able to come home after spending approximately seven weeks recovering from a hip replacement.  We would go and visit him at the rehabilitation facility each week, but it was not the same as visiting at my childhood home where my parents still reside.  Though my parents are aging, I still think of them as young parents who can do anything.

They are extremely active from my Dad continuing to consult with his clients to my Mom’s vast volunteer activities to their monthly RV excursions in their thirty foot motor home that my Dad still commands the driver seat.  Oh and they tow a jeep wrangler in the back.  Though my Dad is now taking a respite from his busy life, I have no doubt that he will be back in action very soon.

Yesterday was a great day.  Yes I am saying it again. Smile.  My Dad was home.  It is a good thing. We ate dinner all together as family and all seemed to be getting back to normal again.  Just simply hanging out with my parents was a great day.  Popcorn was a staple in our household growing up.  From piling into the car to go to the drive in movies to simply having a bowl while watching television, it was something my Mother would always make.


Popcorn in our house was always white not yellow.  Always popped in a cast iron pan that my Dad owned prior to meeting my Mom and often drizzled with melted butter.  To assist with ensuring the butter touched every popped kernel, my Mom would dump into a double paper bag and then hit with the melted butter and salt.  With my parents on my mind, I thought I would whip up a batch of popcorn and add a gourmet spin.  I actually polished off a bowl while writing this post.  Delish!

Garlic, Thyme & Parmesan Popcorn

6 T. Salted Butter
4 to 6 Garlic Cloves, finely minced (About 2 tablespoons)
3 T. Canola or Vegetable Oil
1/2 C. White Popcorn Kernels
1/2 C. finely grated parmesan cheese
2 T. Fresh Thyme Leaves, rough chop
Sea salt to taste

In a sauce pan, melt the butter then add the minced garlic and 1 tablespoon of fresh thyme leaves

You’ll need a large heavy-bottomed pot with lid. Heat oil over medium heat with 2 or 3 popcorn kernels. Once the kernels begin to pop, cover with a lid.  Shake periodically so the kernels do not burn.  Once you stop hearing popping, take off the heat.  Add to a large brown paper bag.  Best to double the paper bags to allow for the oil to absorb and not come through.

Drizzle the garlic and thyme butter over all of the popcorn once in the brown bag and shake well.  Next add the parmesan cheese and shake well.  Taste and then add salt and shake well, until it reaches the desired taste levels you are looking for.  Next add one tablespoon of fresh thyme leaves. With the salted butter and parmesan cheese, you may not need to add too much salt.


Thursday, October 4, 2012

Friday Night Bites | Balsamic Fig Jam Brie Cups


I am extremely excited to share with all of you the debut of my new weekly feature titled “Friday Night Bites”.  For anyone who personally knows me or has been following my blog, understands my love of appetizers and wine.  A little background for you – my hubby and I began a tradition several years that every Friday night we celebrate the end of the work week by unwinding with a bottle of wine and assorted appetizers.  As you imagine, it has evolved over the years. Sometimes we celebrate with simply just the two of us and other times, several friends will join in the festivities.  Either way, it is a cherished tradition that we look forward to each Friday night.

Now for the series name - a couple weeks ago, I shared this idea with my hubby during one of our Friday nights since I was struggling with what to name the series.  Within a minute or perhaps two, he came up with “Friday Night Bites”.  It was catchy. I loved it.  “It was perfect” - I exclaimed. The funny part was he really wanted to ensure that I gave him credit for the name.  Of course honey, I would give credit where credit is due.  I was simply amazed how effortless it was for him to think of it. Big smile.


My goal is to share this new series every Thursday with all of you.  The concept is to give you a fresh idea for an appetizer that you can enjoy on Friday night or during the weekend or in the future.  Since wine is an essential part of the Friday night celebrations, I will share a recommendation that pairs well with the highlighted appetizer. I enjoy making simple yet flavorful appetizers.  Most recipes should have ingredients that are accessible across the country. I apologize in advance if I am too adventurous and create an appetizer that has unique ingredients but will try to share ideas on substitutions.

With my excitement mounting, I am pleased to share my first appetizer in this series with all of you for Balsamic Fig Jam Brie Cups.  I truly have an ongoing love affair with my balsamic fig jam.  It goes with so many things and is quite frankly – addicting!  Hubby and I spent last weekend in Healdsburg for a wine event at Lancaster Estate Winery.  There were 500 people there but I felt like there were only 100 people.  The catering company was simply amazing.  From the Duck Confit filled Savory Doughnuts with Lingonberry Sauce to Mini Chicken and Waffles to the Cookie Bar with assorted cookies and frostings, the food was remarkable.  Okay, if you have never tried Lancaster Wines and you love a full bodied red, please run don’t walk to the winery or order online – you will not be disappointed. Smile.


For these Balsamic Fig Jam Brie Cups, a classic pairing would be a buttery Chardonnay or Brut Champagne.  However, I wanted to step outside the classic just a bit and suggest a light Pinot Noir. On the way home we stopped in HawleyWinery & Vineyards in downtown Healdsburg.  Our intention was to pick up a few bottles of their Viognier, which we enjoyed on our last trip to Healdsburg.  However, in true traditional tasting fashion, you can’t simply walk in and purchase, you have to taste.  Hawley’s Pinot Noir is an awarding winning wine and once I tasted, I completely understood the distinction and honors this wine has earned. 

This Pinot Noir comes from the Russian River Valley and was harvested late to allow for the development of the incomparable flavors in the 2008 release. I tasted ripe cherry fruit with vanilla notes and a very smooth finish. We left with a couple bottles of Pinot Noir and Viognier.  The Pinot Noir is a lovely match for the Balsamic Fig Jam Brie Bites.  This appetizer is a loose recipe that you can make 1 or 3 dozen or more easily.  I have included my Balsamic Fig Jam recipe but you can also purchase fig jam and it will be just as delicious. Enjoy!


Balsamic Fig Jam Brie Cups

Makes 12

Wonton wrappers
Olive oil
Brie (triple crème)
Balsamic Fig Jam
Fresh figs
Micro greens, chives or parsley

Preheat oven to 350

On a cutting board lay out 12 wonton wrappers and brush each side with olive oil.  Use a mini muffin tin to place each prepared wonton wrapper.  Place it centered in the muffin tin and gently push down to fully line the muffin tin.  Press the sides together to secure leaving the center exposed.  Continue until all 12 slots are filled with the wonton wrappers.  Cook for about 5 to 6 minutes until lightly browned and remove.

Fill each wonton with about one to two teaspoons of brie.  Top with about 1 teaspoon of fig jam. Repeat until all wrappers are filled with brie and jam.  Return to the oven for about 5 minutes to melt the brie.  Top the cups with a quarter of fresh fig and garnish with a sprig of microgreen, chive or parsley to add a pop of color.

Fig Balsamic Jam

Makes 12 to 14 pint jars

6 Pounds Fresh Figs – remove stem and cut into quarters
4 ½ Cups Sugar
1 ½ Cups Balsamic Vinegar

Use a large pot. Add all of the above ingredients to the large pot. Stir well to combine all of the ingredients. Place on the stove on high heat and bring to a boil. Once really bubbling lower the heat to medium. The sugar will begin to thicken and the figs will soften. Once the figs are soft, about 45 minutes to one hour. Simple test by pressing the spoon against a fig to the side of the pot. If soft and the liquid is thicker, then it is probably ready.

Remove from the heat and let cool for about 10 to 15 minutes. Using an emulsion blender, puree the jam. If you like it with chunks, then process less.

To process the jam, add to each sterilized jar and wipe around each rim to remove any of the jam that spilled. Put the lid and rim on each jar and tighten, but not too tight. Add each jar to the boiling water of the large pot with tongs and use a canning rack. Process for 10 minutes. Using tongs remove each jar and place onto a towel on the counter. This will prevent the jar from cracking if it hits a cold hard surface. Let cool.

You will hear the lids popping. The popping means the jar is sealed. After an hour, check each jar to ensure you can’t press and hear a popping sound. If you do, it means it did not seal. Simply re-process to obtain a tight seal.


Sunday, September 30, 2012

Sauteed Fava Beans & Pancetta


A couple weeks ago I ventured to a relatively new farmer’s market close to my house.  I had been hearing about how it had wonderful prepared foods along with gourmet items not seen at the other farmer’s markets in the area.  Of course, I had to check it out.  Indeed it was a wonderful new market.  From handmade unique jams to exotic spices to local bakeries, the selections were vast. 


Along with the gourmet goodies, were the standard fresh fruits and vegetables.  I was surprised to see a vendor who was still featuring fresh fava beans.  With these little delights being a favorite of mine, I quickly grabbed a bag and loaded it up.  I was inspired by this recipe from Jean of Lemon and Anchovies back in July and made this recipeI must admit that it was so good, I made a slightly different version and wanted to share with all of you. 


If fava beans are not where in sight where you live, try edamame or cannellini beans to duplicate the dish.  It is a satisfying combination of flavors that will delight any palate.


Sautéed Fava Beans and Pancetta

2 Cups Fava Beans
4 oz. Pancetta, small dice
6 Garlic cloves, minced
8 Sage leaves, sliced thin
Olive oil
Salt and pepper
Shaved parmesan

Cook the pancetta in a medium skillet with about one tablespoon of olive oil.  Cook for about 5 minutes over medium heat until crispy.  Remove from pan and let drain on paper towels.

In medium skillet, add about ¼ cup of olive oil and the minced garlic over medium heat.  Cook for about two minutes and being careful not to burn the garlic.  Add the fava beans and sage leaves.  Cook for about 3 or 4 minutes and then add the cooked pancetta.  Taste and season with salt and pepper.  Serve immediately and garnish with fresh shaved parmesan cheese.

Fava Bean Preparation:

To shuck the beans, simply break off one end of the pod and use your thumb to pry it open. Pop the beans into a bowl and make a pile of pods. The easiest way to peel the beans is to parboil them first. To do so, bring a large stockpot filled with water to a rolling boil. Add the beans and let them cook until they turn bright green. About one minute. Then remove the pan from the stove and drain the beans into a colander. Run the beans under cold water for a minute or so to stop them from cooking any further.

Next, you need to remove the skin surrounding each bean. Use a knife or your fingernail to make a slit in the seam at one end of the bean and then squeeze the bean out. It should pop right out of the skin. Once you've peeled the beans, they are ready to use in any recipe.


Monday, September 24, 2012

"Hot Milk" Vanilla Cupcakes


According to Conde Nast, Miette is ranked one of the top ten pastry shops in the world.  If you live in the Bay Area or visiting, you are lucky enough to be able to experience this charming and delightful pasty shop for yourself.  With location in San Francisco, Oakland and now in Larkspur, there is a location to suit most everyone.

I first experienced this enchanting, whimsical shop at San Francisco’s Ferry Building.  It is a feast for the eyes with the pastel colors and abundance of tasty treats.  Each item is perfectly executed in both the final results and the adorable packaging.  With Miette translating from French to English, it means “crumb”.  It is a baker’s term for describing the texture of the cake. 


The chef and owner, Meg Ray takes great pride in each of her recipes.  Her love for baking stemmed from her youth and reading her mother’s cookbooks; with her favorite being Better Homes and Gardens Cookbook.  With her trips to Paris she gained an appreciation for exquisite pastries along with an artful eye for packaging and presentation.


When the Miette cookbook was released in 2011, I quickly logged onto Amazon to order and expedited the shipping to my house.  The book is filled with recipes for cakes, frostings, tarts, cookies, bars, pastries and candy.  Each recipe is packed with great tips and techniques.  I am simply fascinated with the terrific technique Meg utilizes and in awe of her baking prowess. 


Several weeks ago I visited the Miette location in Jack London Square to pick up a few goodies.  I spied this tiny package of pre-made decorative flowers and actually picked up a few.  I had a vision to make the perfect vanilla cupcake and frosting while adorning each one with the tiny flower and the little green leaf as an accompaniment.


After browsing through her book, the recipe for Hot Milk Cake intrigued me.  The idea of adding hot milk to create a cake was fascinating.  The texture is similar to a sponge cake and extremely moist.  The technique involved is beyond throwing ingredients together, but that is what I loved about this cake.  I felt a bit French for a day.  Smile.

I created a cream cheese frosting to top each one which added that richness to each little cupcake.  I have always been fascinated by mini desserts since it satisfies any craving with a one to two bite delight.  Plus they just look so darn cute.  The flower confection simply completed these little wonders.  I brought some to the neighbors, sent some off to work with my hubby and the rest were enjoyed by my co-workers.  Nice way to start the week off!


Hot Milk Cake

1 1/3 Cup Flour
2 teaspoon baking powder
¼ teaspoon salt
½ Cup salted butter
½ Cup Milk
1 ½ Cup Sugar
3 Large Eggs
1 teaspoon vanilla

Preheat oven to 350 degrees.

Sift together flour, baking powder and salt in a large bowl. Set aside.

In a saucepan over medium low heat, combine the butter and milk together.  Heat until butter is melted.  Let sit off the burner until a thermometer reads 80 to 85 degrees. Whisk occasionally to keep the mixture combined.

Use a glass bowl over a pan of boiling water to create a double boiler.  Whisk together the eggs, sugar and vanilla in the glass bowl and add to the top of the pan without having the water touch the bottom of the bowl.  Gently warm the mixture over medium heat just until the sugar dissolves and the thermometer reads 110 degrees.  Pour the mixture into the bowl of a stand mixer.  Beat the mixture until light and fluffy and has cooled slightly above room temperature to 80 to 85 degrees.  This process should take about 10 minutes.

Stop the mixer and add the dry ingredients slowly until incorporated.  Next add the milk mixture slowly until combined.  Scrape the sides to ensure everything is mixed together.

Use a small ice cream scooper to fill each of the mini cupcakes to 2/3 full. I used a mini muffin pan for the cupcakes. Bake for 12 to 14 minutes until the sides just start to turn golden brown.  Remove from the oven to let cool before frosting.

Yield:  Makes approximately 48 mini cupcakes or 24 regular sized cupcakes

Cream Cheese Buttercream Frosting

12 ounces Cream cheese, room temperature
½ Cup Butter, room temperature
5 Cups Powdered sugar
2 teaspoon vanilla

In a stand mixer, cream together the butter and cream cheese until light and fluffy – about 10 minutes.  Add the vanilla and combine well.  Slowly incorporate the powdered sugar and beat until fluffy.


Thursday, September 20, 2012

Smoky Arugula & Fig Salad with Creamy Balsamic Vinaigrette


I can sense that fig season is winding down. It makes me sad. I simply adore these purple orbs of joy. The bright, vivid garnet color and tiny seeds that glisten with the light hits them, have a regal appeal. From my infamous Balsamic Fig Jam to pizza adorned with figs, I am simply mad about figs.

I guess when the season is complete; I will always have the dried mission figs from Trader Joes along with my stash of jam I made. Speaking of Trader Joes, it just has to be one of the BEST places on earth. My love affair with this store is strong. Each visit seems to yield a new product that either I have overlooked or is simply just that – new!


Ever since visiting Oxbow Market in Napa several months ago, I am obsessed with anything smoky. We tasted smoked olive oil and different salts with smoky additions. I was strolling down the cheese section at Trader Joes and found Smoked Mozzarella. The hint of smoke is muddled throughout this creamy delight. I used it on lavash bread with an addition of cherry tomatoes to make a refreshing pizza. With this salad I thought it would be a wonderful accompaniment to the figs and the smoky almonds from Trader Joes.

I was craving a salad and after pursuing the refrigerator and pantry, these ingredients simply sang to me. The sweetness of the figs along with the smoky components and the creamy balsamic dressing were a marriage made in heaven.

Smoky Arugula & Fig Salad with Creamy Balsamic Vinaigrette

8 C. Arugula
½ Medium Red Onion, sliced thin
¾ C. Smoked Mozzarella Cheese, grated
½ C. Smoked Almonds, rough chop
8 to 10 Fresh Figs, quartered

Creamy Balsamic Dressing

1 Shallot, minced
2 T. Mayonnaise
1 T. Dijon mustard
2 t. Honey
½ t. Salt
8 Grinds of fresh ground pepper
½ C. Balsamic Vinegar
1 C. Olive Oil

Add all ingredients to a pint sized mason jar and place the lid on top. Shake well and let sit in refrigerator for at least one hour to develop flavors. Refrigerate after using. 

Toss with salad ingredients and enjoy!

Monday, September 17, 2012

Pumpkin Yeast Rolls + Pumpkin Butter | Secret Recipe Club


It can’t be September already?  Why does time seem to fleet past us at such a rapid pace? It is approximately the third Monday of each month that I anticipate in the Secret Recipe Club monthly reveal of group C’s posts.  If you are not familiar with the Secret Recipe Club, it is a group of talented food bloggers who are paired each month with another blogger to select and prepare a recipe from their blog.  On reveal day, each food blogger eagerly awaits to see who they were paired with and what that person selected.  It is a whole lot of fun and if you are interested in joining, simply click on the link to learn more.


This month I was paired with Kate from Kate's Kitchen.  I was excited to learn that I was paired with Kate, since I have enjoyed her blog for several years.  Kate is a financial planner who lives to cook.  She and her hubby Connie love to cook, garden, and travel, watching Colts football and Red Sox baseball and going to the Civic theater to take in a show.  Kate has a vast array of recipes on her site which made it hard to choose one. 


With Labor Day behind us, the changing of the seasons is happening.  The days are getting shorter. The days are still warm yet the nights have a particular crisp sensation.  The light has a different filter.  The scent of fall is apparent in the air.  Halloween decorations line the shelves.  Pumpkins are popping up everywhere – in stores, recipes and Pinterest.  Fall is almost officially here.


Once I spied Kate’s Pumpkin Yeast Rolls, I knew that would be the recipe.  My hubby adores fall and especially anything with pumpkin.  These light yeasty delights would be the entrée to fall.  They were so simple to make and the result was just perfect.  Pumpkin butter has been on my bucket list for a while.  Since I had leftover pumpkin puree – what better way to utilize it, then creating some pumpkin butter to go along with these heavenly rolls.  Fall has officially begun!


Pumpkin Yeast Rolls

1 (¼  oz) package active dry yeast
¼ C. Warm water
½ C. Milk
½ C. Pumpkin
1/3 C. Sugar
1 t. Salt
4 T. Butter
2 ½ C. All purpose Flour

Dissolve the yeast in the warm water.  The temperature should be about 105 degrees.  Set aside.  Next you want to scald the milk.

Add the pumpkin, sugar, salt and butter to the scalded milk.  Remove from the heat and the butter should melt from the heat.  Add to the burner if needed to complete the butter melting process.

Add the yeast and water to the pumpkin mixture and stir.  Put 2 ½ cups flour in a large bowl.  Add the pumpkin mixture to the flour and mix well. 

Put the roll dough on a floured board and knead it until it is smooth and elastic.  Add more flour as needed.  Oil a medium sized bowl and place the dough in there.  Cover it and put it in a warm place to allow it to rise until it has doubled in size – about 1 to 2 hours.

Punch it down and move it to a floured board.  Divide the dough into 12 equal portions or 24 if you want smaller rolls and shape into balls.  Place the rolls into a greased 9x13 pan. 

Cover the pan and allow the rolls to double in size.  The rolls will touch and that is perfect.  Preheat the oven to 350 degrees and bake for 18 to 20 minutes.  Serve with pumpkin butter.


Pumpkin Butter
.
14 oz. pumpkin puree
1/2 cup sparkling apple cider
1 teaspoons ginger
1/4 teaspoon cloves
1 teaspoons cinnamon
½ teaspoon nutmeg
¾  C. sugar

Combine all ingredients in a large saucepan. Bring to a boil, then reduce to a simmer and cook, stirring often, for 20 minutes, or until mixture thickens. Let cool to room temperature. Pack into storage containers and refrigerate for up to a month. Pumpkin butter can also be frozen for up to 6 months. 


Sunday, September 9, 2012

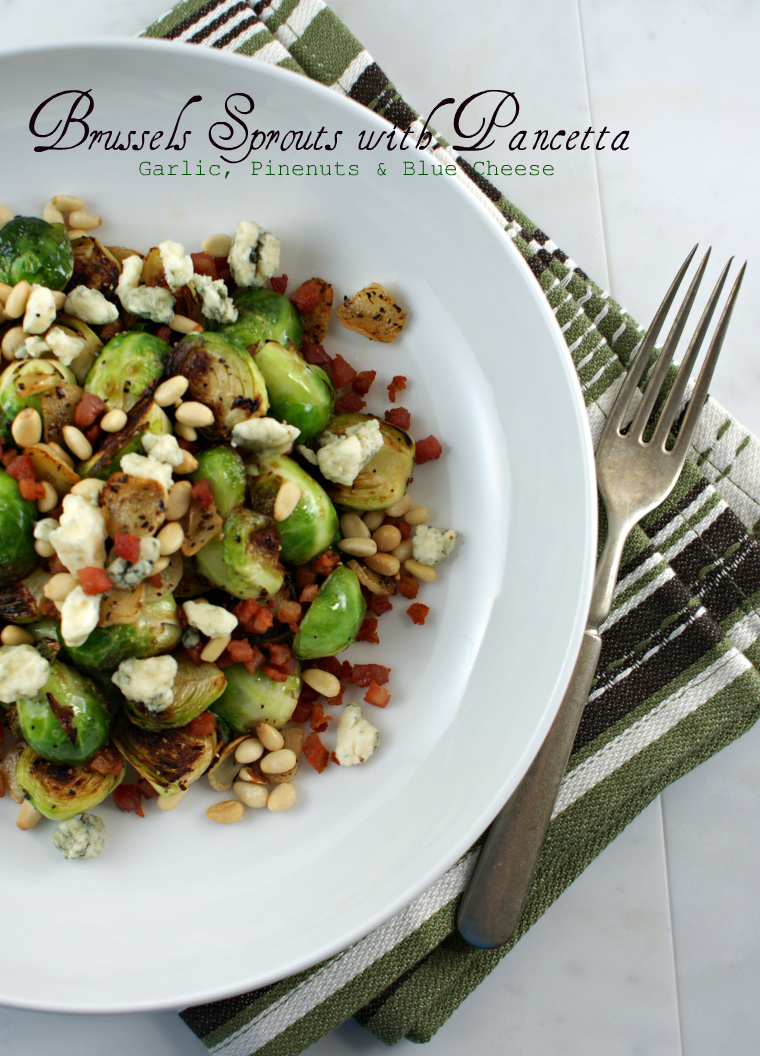
The Perfect Dinner Party + Brussels Sprouts with Pancetta, Garlic, Pinenuts and Blue Cheese


There is a certain art or finesse to throwing The Perfect Dinner Party.  Let me stop for one moment since I use the term “perfect” with caution.  Every person defines “perfect” differently.  Perfect could mean all of the china, crystal and silver are utilized.  Perfect could mean handmade baked lasagna served with a fresh salad and crunchy bread.  Perfect could mean Chinese take out simply placed in large white bowls and served family style. Whatever is perfect for you is YOUR perfect.


My definition of the perfect dinner party is bringing people together for an evening of comfort, conversation and cohesiveness. A dinner party is a reason to be creative and give your guests a gift of yourself.  The gift is bringing together old and new friends to share great food, wine and conversation around the dining table.  A good dinner party means clean plates, numerous wine glasses, and empty bottles of wine, laughter and lovely music.  It is the kind of evening where everyone wants to linger and no one wants to say goodbye.


Mark, Me and Dean

Over the years I have learned the art of throwing my perfect dinner party.  The key is to make your guests feel comfortable the moment they arrive through the front door until the last goodbye.  Planning and working backwards will aide tremendously in the success of your soirée. My trusty list that I create on 5x7 index cards is my savior.  First comes the menu, then the shopping list along with the basic entertaining checklist (cleaning, setting the table, choosing the music) and the final checklist for the day of the dinner party.


Work backwards to set your personal timeline that will weave in between career, family and daily errands then add to the list with dates and times to complete. Utilize your index cards and keep them in the kitchen area for ease of use.  Planning will reduce stress and increase the wonderful time you will have with your guests. 


Preparing a menu that is both easy and flavorful takes a bit of skill, but something you can master quite quickly.  Think about dishes you can prepare as many of the ingredients ahead of time.  For example, have everything for a flavorful salad done ahead from cutting vegetables to having the dressing made and you then simply toss together and serve.  Braised dishes are one of my favorites – simply dump ingredients into a dish and bake for hours while the flavors develop those rich aromatics and your guests think you slaved over the stove for hours.  The more you practice putting together menus, the easier and more adventurous you will become. Speaking of menus, I always create a personalized menu for each dinner party.  Guests can take one home as a memento.  I have been keeping a large binder for years that houses all of the menus from dinner parties.


The one rule of thumb I always practice is being 100% ready a minimum of 30 minutes prior to my guests arriving.  It gives me the chance to sip a bit of chilled wine along with walking through the evening in my head and checking for last minute touches.  Drinks and appetizers are always ready for the guest’s arrival with a customized cocktail playlist in the background.  Often it is fun to have a signature drink for each event along with the usual suspects – wine, sparkling water, beer and spirits.  A signature drink can set the tone and add some whimsy to the event.


Keep a timeline in mind when moving through the evening from the cocktail/appetizer hour to dinner to dessert to after dinner drinks and conversation.  No need to rush your guests, but they will appreciate a flow to the evening.  As the hostess you are the conversation starter, contributor and listener. Try adding some dinner conversation by introducing “Dinner Party Table Topics” to spice up the chatter. Ensure your guests have enough to drink, eat and are comfortable. If your guests are lingering and having a wonderful time, enjoy these special moments and cherish them.


It brings me joy to open our home, create a special menu and share great conversation with friends.  Recently I threw a perfect dinner party for our wonderful friends and I am dedicating this post to you both.  Mark and Dean you are simply divine!


Brussels Sprouts with Pancetta, Garlic, Pinenuts and Blue Cheese

1 Pound Brussels Sprouts, trim bottom and cut in half
2 to 3 T. Olive Oil
4 to 6 cloves of garlic, peeled and sliced
Salt and pepper
4 oz. Pancetta, small dice
½ Pinenuts
1/3 C. Blue Cheese, crumbled

In a large pan, add a tablespoon of olive oil and then add the pancetta.  Cook on medium until the pancetta is crisp.  Remove from the pan.  Add the Brussels and a couple more tablespoons of olive oil.  Season with the salt and pepper. Cook for 5 to 9 minutes on medium until golden brown and just turning tender.  Add the garlic and cook for one more minute. 

Remove from the heat and toss into a large bowl.  Sprinkle with the pancetta, pinenuts and blue cheese.  Serve immediately. 


Mark, Charles aka Hubby and Dean 

Thursday, September 6, 2012

BBQ Pork Meatballs + "Lower East Side" BBQ Sauce


I still remember vividly a particular Martha Stewart episode last November. She featured Daniel Holzman and Michael Chernow from The Meatball Shop in New York. I was captivated by the concept of two guys starting a restaurant that was based on one simple thing – The Meatball. Genius. Brilliant. Perfectly contemporary.


Daniel and Michael are two guys born and raised in New York City. They are distinct individuals who had a vision and executed it perfectly. Daniel is the Executive Chef and co-owner who began his culinary adventures and career at the tender age of 15 at the reknowned LeBernardin and attended the Culinary Institute of America with a full scholarship from the acclaimed James Beard Foundation. Impressive indeed. Later he would weave his way around the united states with career stops in Vegas, Los Angeles and San Francisco.


Michael is the General Manager and Co-owner of The Meatball Shop. He began his professional restaurant career in 1996 behind the bar at a popular nighclub on Bleeker Street in NYC. Like Daniel, he made the move to Los Angeles and worked at Woo Lea Oak’s and then returned to NYC to open Punch and Judy and later opened the flagship restaurant called Frank on Second Street. He graduated from the French Culinary Institute with honors. Nice credentials.


If only these two innovators were to open a location on the west coast, specifically in the Bay Area. Sigh. At this time, I can only dream OR hop on a plane to NYC to relish their glorious meatball delights. The next best thing was when their cookbook jumped out at me with my visit last weekend to Williams Sonoma. The distinctive yellow cover, just screamed – “ buy me now!”

Once I got the book home and carefully reviewed each magnificent recipe, the BBQ Pork Meatballs sung to me along with the “Lower East Side” (L.E.S.) BBQ Sauce. All I can say is that they were simply divine! Hubby was in meatball heaven and asked when are you making another recipe from that wonderful cookbook? My answer was – “quite soon”. Smile.


“Lower East Side” Barbecue Sauce

Makes 3 cups

¼ Cup Whiskey ( add a dash or two more if desired - wink )
2 tablespoons olive oil
10 cloves garlic, chopped roughly
1 cup yellow onion, finely diced
1 ½ tablespoon ground cumin
1/2 teaspoon crushed red pepper flakes
2 teaspoons salt
1/3 cup espresso
1/2 cup apple cider vinegar
2 cups ketchup
1-1/2 cups dark brown sugar

Heat the olive oil in a large saucepan over a medium high flame. Add the garlic, cumin, onion, red pepper and salt and cook stirring frequently until the onions and garlic are soft and translucent, about 15 minutes. Do not allow the garlic to brown, add a few tablespoons of water if necessary.

Add the espresso, vinegar and whiskey and bring to a boil.

Remove to a blender and blend on high until smooth (be careful when blending hot liquids).

Add the blended mix back into the pot and whisk in the brown sugar and ketchup until fully incorporated and smooth. Refrigerate until needed.


BBQ Pork Balls

Makes 2 dozen 1/1/2 inch meatballs

2 pounds ground pork
3 tablespoons olive oil
1 small onion, finely diced
1 cup “Lower East Side” barbecue sauce, recipe below
2 large eggs
3/4 cup panko bread crumbs
1 teaspoon salt

Preheat the oven to 450°F. Heat 1 tablespoon of the olive oil in a medium frying pan over high heat. When it begins to smoke, add the onions and sauté over a high flame, stirring frequently until they are soft and well-browned (about ten minutes). Remove to a tray and cool in the fridge.

Combine all of the ingredients except for the rest of the olive oil in a large mixing bowl and mix by hand until thoroughly incorporated.

Drizzle the olive oil into a large baking dish (9” x 13”) making sure to evenly coat the entire surface (use your hand to help spread the oil).

Roll the mixture into round, golf ball-sized meatballs, making sure to pack the meat firmly.

Place the balls into the oiled baking dish such that all of the meatballs are lined up evenly in rows and are touching each of their four neighbors in a grid.

Roast until firm and cooked through (about 20 minutes).

Allow the meatballs to cool for five minutes before removing from the tray.

*Recipes slightly adapted from The Meatball Cookbook by Daniel Holzman and Michael Chernow