Today in the Bay Area it was chilly with consistent rain
pounding the pavement. The trees were
whipping and shaking with the substantial wind.
Winter is here. The sun never
peaked out today and it turned out to be a great day to stay indoors.
Sunday, December 23, 2012
Thursday, December 20, 2012
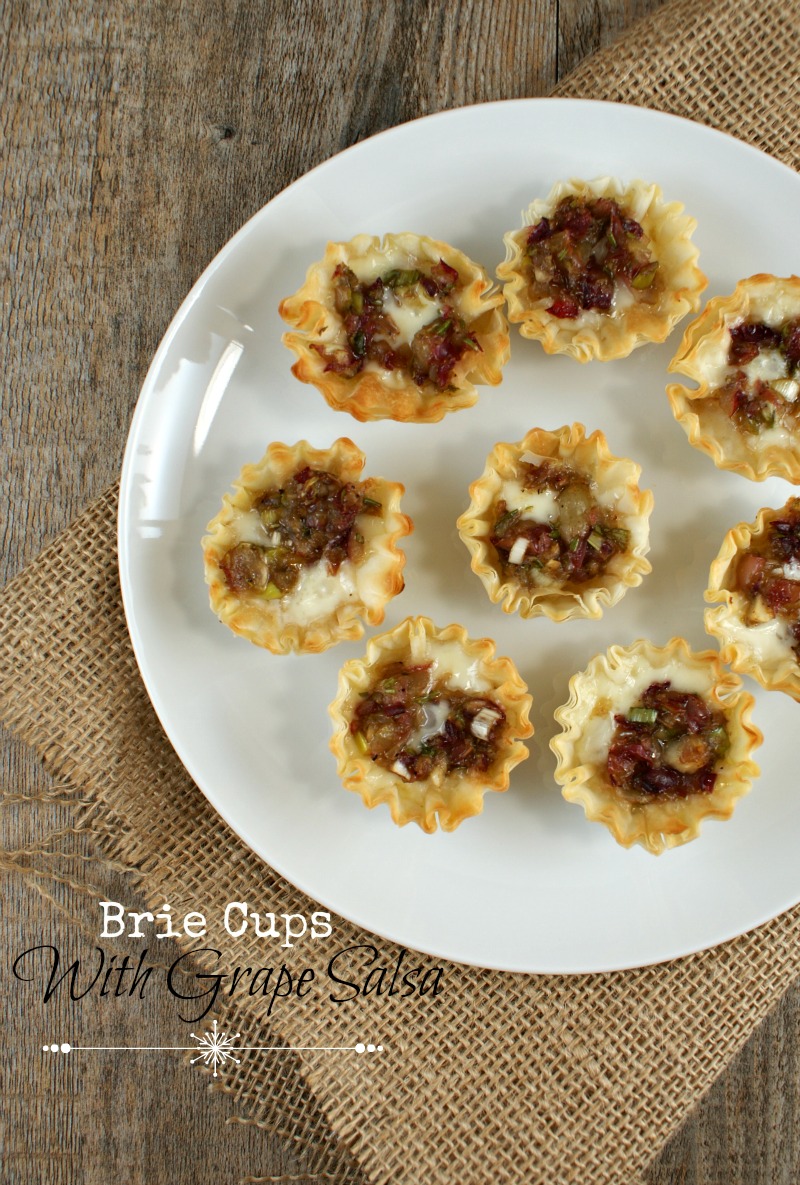
Friday Night Bites | Brie Cups with Grape Salsa + Cocktail Party Tips
With festive parties abundant this time of year, it the
perfect reason to celebrate the season and throw a fun cocktail party. The party can scale from half a dozen friends
to an extravagant bash for fifty. Honesty by preference is the more intimate
affair with 6 to 12 people in attendance.
It gives me the opportunity to really socialize, converse and enjoy my
guests. The idea of simply serving a signature cocktail as a starter then a
variety of new and old world wines along with tasty bite sized delights is pure
perfection in my book.
At the moment, I am in the final stages of planning such an
event for next week. A long time friend
is visiting over the holidays so why not host a celebratory cocktail party in
her honor. The invitations have been
sent, RSVP’s completed and the menu is nearly complete and now I just need to
settle on the signature cocktail. I can
hardly wait for next week. Quite frankly,
one of my favorite parts of throwing a party is the planning and of course the
actual event is the piece de resistance.
Among my favorite appetizer recipes to share with my guests
is the Brie Cups with Grape Salsa, which pairs perfectly with the Grgich Hills Chardonnay. With the grape being the
common denominator, the compliment of the wine and tartlet was a match made in
heaven. These appetizers are super
simple to make and pack a lot of flavor.
I highly recommend that you make the grape salsa ahead of time, so the
flavors have time to marry together. For
the tart cups, I purchased Athens brand Mini Fillo Shells since they are simply perfect each time. If you are feeling creative, you could use store
bought wonton skins. Simply brush with a bit of olive oil and place into a mini
muffin tin. Cook at 350 for 5 to 10
minutes or until crispy golden brown.
If you are hosting a cocktail party soon, would love to hear
about it!
Brie Cups with Grape Salsa
1 C. Red seedless grapes, cut in half
1/3 t. Salt
2 T. Green onion, finely chopped
1 T. Balsamic vinegar
2 T. Olive oil
1 t. Rosemary, finely minced
1 Small clove garlic, minced
6 Grinds of fresh ground pepper
30 Pre-made Athens mini phyllo shells
6 oz. Brie, rind removed
Preheat oven to 350.
Place the grapes and salt in to a food processor and pulse
until grapes are coarsely chopped. Transfer to a strainer and let sit for about
5 to 10 minutes. In a bowl, mix the
green onions, balsamic vinegar, olive oil, garlic pepper and strained grapes
together. Let sit to marry the flavors
together for at least 15 minutes.
To assemble, lay the 30 shells out onto a cookie sheet and
place about ½ t. of brie in each cup and then about a half to full teaspoon of
the grape salsa. Bake for about 5
minutes, until the cheese melts. Serve immediately.
Adapted from: Cocktail Food by Mary Corpening Barber & Sara Corpening Whiteford
Monday, December 17, 2012
Thursday, December 13, 2012
Friday Night Bites | Smoky, Spicy and Sweet Bourbon Peanuts
A vacation day - what a rare opportunity that I take
advantage of, but need to more – especially after such a wonderful day that I
have had so far today. It is a day filled with food, friends, laughs,
good conversation and great memories.
Patty from Patty’s Food arranged several weeks ago a cookie swap and lunch for a group of food bloggers. I could hardly wait to attend and finally the day had arrived. From all sides of the bay Area, we made our way into
After we finished gorging ourselves, well maybe not quite dramatic of a word, the best part was yet to arrive - the highly
anticipated cookie swap. Patty arranged this swap perfectly. Each
person brought half dozen cookies to share with everyone plus four to cut in
half to enjoy at the table with a cup of piping hot coffee. I wish you
all could have dived into the cookies. These are some talented ladies.
Always fun to catch up with these ladies and today was no exception. Big smile.
We even packaged up the shared cookies and gave to our waiter as a special
gift.
Now it is time to head off for our annual holiday dinner with
my book club. Another great restaurant to enjoy tonight, just hope I have
some resemblance of an appetite after today’s lunch. I wonder how much
discussion will actually happen around this month’s selection - Telegraph Avenue . Smile. Wink.
Smoky,
Spicy and Sweet Bourbon Peanuts
8 (oz) Bag
of Shelled Peanuts
3 T.
Bourbon
2 T. Maple
Syrup
3 T. Brown
Sugar
1 t. Salt
½ t.
Cayenne Pepper
1 t. Smoked
Paprika
Preheat
oven to 250 degrees
Use a
medium sized bowl and add all of the ingredients together except the
peanuts. Mix well. Next add the peanuts and coat well with the
bourbon mixture. Use a sheet pan with
sides and spread the peanuts evenly.
Cook for 25
minutes. Halfway through, stir the
peanuts to ensure they are well coated.
Remove and let cool. Use a spatula to loosen the peanuts and store in an
airtight container.
Wednesday, December 12, 2012
Holiday Checkerboard Cookies | 2nd Annual Great Food Blogger Cookie Swap
What a
wonderful time of year! The holidays are
here – a time for spending time with family and friends. The cheer is flowing along with an abundance
of tasty treats. Speaking of delicious
treats, this time of year brings out a plethora of delightful cookies. It is a time for cookie baking, cookie swaps
and trying new recipes, and of course, partaking in eating these one or two
bite delights.
Thursday, December 6, 2012
Friday Night Bites | Parmesan Pecan Dip
With the
holidays now here - festive parties are in full force. How many events do you already have scheduled
or double booked this season? Whether it is for your office, a gathering of
friends, spending time with family or other festive gatherings, now is the time
to indulge in holiday cookies, a plethora of appetizers and other gourmet
delights. Last night was the start of my
social gatherings. I participate on a
local board for Human Resource professionals and the last meeting of the year is
a potluck of sorts. With this being the
third year I have been a member of the board, I have now been infamous for a
particular appetizer – Parmesan and Pecan Dip.
It is widely
requested among people who know me. When
folks taste it for the first time, it is literally addictive and you can’t help
but go back for seconds, thirds, fourths and even a tenth one or more. Trust
me. Years ago I brought it to one of my
offices and a gentleman who doesn’t really cook was instantly hooked. He subsequently asked for the recipe and made
it for every event he had. I would get
emails from him letting me know that he made the “crack dip” again. He made it for his football buddies and it
was gone super quick. He is no longer
with our company, but every once in a while I will get an email letting me know
that he made the dip and it was a hit.
Love that!
This is the dip
that you can bring to all of your holiday events and I guarantee that you will
be the star at your event. It is that good. This dip would be perfect with almost any
wine from a dry sparkling wine to a buttery chardonnay to a deep cabernet
sauvignon.
Parmesan and Pecan Dip
1 C. finely diced celery
1 C. chopped roasted pecans
1 C. chopped parmesan
½ C. chopped flat leaf parsley
Dressing:
2 small garlic cloves minced and mashed with ½ teaspoon of salt
1 T. Mayo
2 T. Fresh squeezed lemon juice
2 T. Olive oil
Endive leaves (3 to 4 whole endives)
Roast the chopped pecans for about 10 minutes in a 375 degree
oven. You can skip this step by purchasing the dry roasted pecan pieces at Trader
Joes. Blend the dressing ingredients in a small mason jar and shake until well
blended. Place in the refrigerator until ready to use.
Chop the first four ingredients and put everything, except the
pecans in a bowl into the refrigerator until ready to serve. Set pecans aside.
When ready to serve, add the pecans and dressing. Toss well and transfer to a
pretty serving bowl. Add to a platter with the endive leaves. Use a small spoon
to have guests top each endive leaf.
Tuesday, December 4, 2012
Beer & Pumpkin Chili + BlueStar Cookware Review
Recently Wendy from Smart Click Advertising reached out to
me directly to see if I would be interested in reviewing a new line of cookware
from BlueStar. Prior to accepting
Wendy’s offer to send me cookware to review, I did research BlueStar, since I
had never heard of them prior. I quickly learned the BlueStar label is part of
Prizer-Painter Stove Works, Inc and began handcrafting and manufacturing stoves
since 1880. In 2002, Prizer introduced
handcrafted, restaurant quality ranges for the residential market under the
BlueStar brand.
Sunday, December 2, 2012
Pumpkin and Bacon Pasta
The skies over the Bay Area unleashed this morning with
pounding rain and hallowing winds. With
ominous weather conditions that are not typical for the Bay Area, hubby and I were fascinated by watching and listening to Mother Nature’s fury. Not sure if
she was mad or simply helping us to prevent a draught in the springtime. I would like to think it is the latter. Smile. We were facinated by the sheer volume of rain that pounded down onto our tiny neighborhood.
It was amazing to see the gutters clogged and mounds of rain
gushing down towards the ground. The end
of our court had water piling up and spouting up from the storm drains. The great news was that we were able to stay
inside and not have to drive through the treacherous conditions on the road.
We enjoyed our hot cups of coffee, a bit of Good Morning
America weekend and some fresh off the griddle pumpkin pancakes. Speaking of pumpkin, my affection for
anything pumpkin continues with this quick pasta dish I created. It is hearty, flavorful, textural and ever so
satisfying. Where ever you are in the
globe, I hope you are having a Sublime Sunday!
Pumpkin and Bacon Pasta
2 ½ Cups Roasted pumpkin cubes
10 Slices Apple wood Smoked Bacon, coked crispy and crumbled
1 lb. Linguini, cook according to package
2/3 Cup Ricotta Salata Cheese
2/3 Cup Parmesan Cheese
6 Garlic large cloves, minced
10 to 12 Fresh sage leaves, rough chop
½ Cup Olive Oil (more if desired)
½ Cup Flat leaf parsley, rough chop
¼ Cup Pepitas
Preparing the pumpkin:
Take one sugar pumpkin and cut into quarters and remove
seeds and pulp. With a sharp knife, cut
away the outside skin. Then cut into ½
cubes. Lay onto a sheet pan with sides
and toss with olive oil and salt. Bake
for 30 minutes at 350 degrees or until tender.
Remove from oven and set aside to cool.
Preparing the pasta:
Prepare the pasta according to the package until al
dente. Drain into a colander and set
aside. Meanwhile add the garlic and
olive oil to a large skillet. Cook over
medium for 2 to 3 minutes. Add the
cooked pasta and toss. Add more olive
oil if too dry. Heat through for 2
minutes over medium. Toss in the cooked
bacon, sage, parsley and season with salt and pepper. Taste and add more seasoning and sage or
parsley if desired. Add to a large bowl
and toss with the ricotta salata and parmesan cheese. Sprinkle the pepitas on top and serve. Have a bowl of parmesan cheese near by to add
extra if desired.
Thursday, November 29, 2012
Friday Night Bites | Pumpkin Caramelized Onion Pizza
Yesterday we had the first of many storms to hit the Bay
Area. It was filled with heavy down
pours and gusty winds. If you are familiar
with the lay of the land in the bay area, you know that we have many counties
relatively close together along with unique traffic patterns. Not too mention, quite a bit of traffic. I needed to be in multiple locations for
various meetings for work. I actually
traveled across different 5 counties during the day and covered quite a bit of
distance. In the midst of my travels I
contended with heavy down pours and strong winds along with highways that had
built up water. It was quite a day
indeed. The good news is that I made it
home safely.
We are expected to have similar storms through Sunday this
week. With that, it is a perfect time to
make comfort food for our Friday Night Bites that we celebrate each Friday
evening. Pizza and beer is a classic
pairing and perfect for a casual evening at home. If you know me, I need to add
the Authentic Suburban Gourmet spin.
With my slight obsession this year with pumpkin, I created a pizza with
roasted pumpkin and caramelized onion. I
felt this combination was a marriage made in heaven. I tossed in some fresh sage leaves and really
good white cheddar cheese. The result
was a combination of savory fall flavors on top of rich crispy yet chewy pizza
dough. Completely satisfying!
We have a tradition in our family that over the holidays,
especially during Christmas, my brother brings the latest vintage of the AnchorSteam’s Christmas Ale. Each year a new
recipe is created and varies slightly from the prior year. As the label at the top states for the 2012
vintage – “This is the thirty eighth “Our Special Ale” from the brewers at
Anchor. It is sold only from early November to mid January. The Ale’s recipe is different every year, as
is the tree on the label, but the intent with which we offer it remains the
same: joy and celebration of the newness of life. Since ancient times, trees
have symbolized the winter solstice when the earth, with its seasons, appears
born anew.”
With the rich, dark spiced ale, I felt this was a perfect
pairing for the fall pumpkin and caramelized pizza. I made each pizza more of an individual
serving size since it was just hubby and I; however, you could cut into smaller
pieces and serve to a small crowd. The
recipe is a bit “loose” so you can increase or decrease the amount of each
ingredient you put on top to customize to your preference. Enjoy!
Pumpkin Caramelized Onion Pizza
Pizza dough (handmade or store bought) (I used Trader Joe’s)
1 Cup Roasted Fresh Pumpkin, cut into small cubes
1 Large Onion, peeled, cut in half and sliced thin
2 Tablespoons Butter
1 teaspoon sugar
Salt
Pepper
Olive oil
Fresh sage leaves
Garlic powder
White cheddar cheese
Pumpkin:
Take one sugar pumpkin and cut into quarters and remove
seeds and pulp. With a sharp knife, cut
away the outside skin. Then cut into ½ cubes. Lay onto a sheet pan with sides and toss with
olive oil and salt. Bake for 30 minutes
at 350 degrees or until tender. Remove
from oven and set aside to cool.
Caramelized Onions:
Slice a large onion in half, peel the skin and slice each
half into thin slices. Use a large
skillet. Over medium heat, melt the 2
tablespoons of butter, then add the sliced onions, sugar and season with salt
and pepper. Over medium heat, toss everything together to completely coat the
onions. Stir frequently and cook until
golden brown. Should be about 15 to 20
minutes. Set aside.
Pizza:
Preheat oven to 500 degrees
Shape the dough into mini pizzas or one large, your
preference. Drizzle with olive oil and
sprinkle desired amount of garlic powder over dough. Spread the desired amount of caramelized onions
and then put the desired amount of the roasted pumpkin cubes over the
onions. Season with a bit of salt and
pepper. Sprinkle the desired amount of
grated white cheddar cheese on top. Add
some of the fresh sage leaves over the cheese.
Bake on a pizza stone for best results. Cook until the edges of the
pizza are golden brown – about 15 minutes. Add a few fresh sage leaves prior to serving.
Tuesday, November 27, 2012
Cardamom Pear Crisps + "Desserts in Jars" Cookbook Giveaway
Desserts in Jars – what a perfect
concept! They are easy, compact, simple
and easy to serve. Desserts in Jars is a
new cookbook from Shaina Olmanson from the popular blog Food for MyFamily. Shaina has a pedigree of accolades
to her credit – from being ranked in the top ten in Babble.com’s 2011 list of
the 100 best food blogs for moms to being named a “Top 10 Family Cooking Blog”
by My Life Scoop. Kudos to Shaina!
Sunday, November 25, 2012
Pecan Thumbprint Cookies with Cranberry Chutney
I love, love this time of
year. The weather just looks and smells
like the fall season with winter around the corner. Here in the Bay Area, we are beggining to experience rain and often chilly nights. It
is the perfect weather for having a fire at night and tons of blankets for
watching our favorite television programs.
Hubby and I are currently making our way through the "Countdown to Christmas" which features new holiday movies on the Hallmark channel. They are "feel good" movies that 9 out 10 times have a romantic story behind them. Okay, we are saps for a great romantic
storyline. Smile.
Thursday, November 22, 2012
Friday Night Bites | Ham and Cheese Palmiers + Thanksgiving Reflections
Happy Thanksgiving to each
and everyone! Thanksgiving is a day to
reflect on all of the gifts we have. Be
thankful. Be grateful. Be appreciative. Be with family and friends. Be able to
give back in a small or large way to others.
I am personally thankful for
so much - my wonderful hubby, terrific family, great friends, health, rewarding
career and to work for a special company and my cute doggie Max. I am very thankful for
all of YOU, my faithful readers of my blog.
These are at the top of the list, but I could go on for quite sometime,
but won’t bore you. I do work for an
outstanding organization that is like a second family. Our Director of Human Resources sent an email
out to the entire company to ask everyone to share what they are grateful
for. The response was overwhelming with
high percentage of the company responding – that speaks volumes.
An “All Employee” email
was sent out yesterday revealing what everyone was thankful for. The common theme was family, friends, and the
wonderful organization we work for. A
few unique items were thrown in such as being thankful for Tom Petty and the
Heartbreakers music, but if that is what that person is thankful for – more power
to him or her. Smile. At the top of the email
was a quote that sort of says it all….. “Acknowledging
the good that you already have in your life is the foundation for all
abundance” Eckhart Tolle.
With Thanksgiving Day being
the kick off to the holiday season, a big part of the many celebrations is
food. Today we will be celebration the
holiday with my parents and my siblings and their family – I can’t wait to see
everyone. Each year we divide and
conquer the food duties. I am in charge
of bringing the appetizers. Surprise huh?
Wink. Smile. I am bringing a
quick and tasty appetizer that has been a staple for quite sometime. It is the perfect appetizer to make when you
need a last minute appetizer that will impress your guests.
My Ham and Cheese Palmiers
are quick, easy and pack a punch of flavor.
The presentation looks like you slaved for hours in the kitchen. A perfect pairing for these delights is your
favorite Chardonnay. One of my all time
favorite Chardonnays is from Grgich Hills Estate. They craft their wines from grapes that are
organic and biodynamic along with no malolactic fermentation which in turn
retains the acidity. The aromas and
flavors found from this wine are tropical fruits, orange blossom honey and
toasted almonds. There is certain
richness and butter tones as you sip through this delightful wine.
Ham and
Cheese Palmiers
1 sheet puff pastry, thawed
2/3 cup (lightly packed) Jarlsburg cheese, shredded
4 to 6 slices of Black Forest Ham
1 sheet puff pastry, thawed
2/3 cup (lightly packed) Jarlsburg cheese, shredded
4 to 6 slices of Black Forest Ham
1/3 cup Pesto
(handmade or store bought)
Preheat oven to 400 degrees F. Use a non-stick baking sheet.
On a lightly floured work surface, roll out puff pastry to 1/4 inch thick.
Spread the pesto over the entire pastry leaving 1/3 inch free of pesto along the edges. Sprinkle the grated Jarlsburg over pastry and then lay the ham over the cheese to cover.
Roll one side tightly to the middle, then roll the other side to middle and press slightly together. Wrap in plastic wrap and chill for 30 minutes in the refrigerator. Use a sharp knife, cut into ½ inch slices thick.
Place on prepared baking sheet spacing the rolls 1 inch apart. Bake 12 to 15 minutes, or until rolls are puffed and golden. Let cool 10 minutes before serving.
Preheat oven to 400 degrees F. Use a non-stick baking sheet.
On a lightly floured work surface, roll out puff pastry to 1/4 inch thick.
Spread the pesto over the entire pastry leaving 1/3 inch free of pesto along the edges. Sprinkle the grated Jarlsburg over pastry and then lay the ham over the cheese to cover.
Roll one side tightly to the middle, then roll the other side to middle and press slightly together. Wrap in plastic wrap and chill for 30 minutes in the refrigerator. Use a sharp knife, cut into ½ inch slices thick.
Place on prepared baking sheet spacing the rolls 1 inch apart. Bake 12 to 15 minutes, or until rolls are puffed and golden. Let cool 10 minutes before serving.
Monday, November 19, 2012
Fleur de Sel Caramel Carmelita Bars | Secret Recipe Club
It is Secret Recipe Club time again. Boy how time flies. Not familiar with secret recipe club, well
let me let you in on the secret. No pun
intended. Wink. Smile. It is a group of talented food bloggers who
are paired monthly with another blogger in the group. You have time to browse through your assigned
blogger’s blog to find the perfect recipe that you want to make. When reveal day comes along, you can see who
was matched with you and what recipe they chose from your blog. It is so much fun to see what folks select
and how they adapt it to their own personal style.
This month I was assigned to Danielle from Hugs & Cookiesxoxo. She is a mom to two wonderful boys named Jaden and Jakey and she calls her husband - "Prince Charming" - that is super cute. She teaches first grade and loves baking, cooking, blogging and spending time with her beautiful family. She has numerous recipes that are tantalizing and can cure any sweet tooth. After browsing through her blog several times, I kept coming back to the Carmelita Bars. They have been on my list for quite sometime and this was the perfect opportunity to make them.
Caramel is one of my favorite things. After analyzing the recipe, I thought I would create my own caramel squares versus the ones from the store. The fleur de sel caramels recipe is from InaGarten of the Barefoot Contessa fame and as like the Carmelita bars, that recipe had been a “must make” for quite some time. If you click here, you can see my post for the fleur de sel and I have also included in this post. I must warn you, it is highly addictive. Smile.
I brought these Carmelita Bars to one
of my offices the next day and they flew off the plate like wild fire. In fact one person in the office, who shall
remain nameless, ate over 10 of them that day. I am sure they hit the gym after
work. Smile.
Fleur de Sel Caramel Carmelita Bars
2 cups flour
2 cups quick cooking rolled oats
1 1/2 cups packed brown sugar
1 teaspoon baking soda
1/4 teaspoon salt
1 cup butter, melted
16 fleur de sel caramels (see recipe below)
2 cups semi-sweet chocolate chips
1 cup chopped pecans
Preheat oven to 350º. Grease 9 x 13 inch pan.
In large bowl, combine flour, oatmeal, sugar, soda and salt. Stir to blend. Add melted butter and mix till well combined. Reserve half the crumbs, about 3 cups. Press remaining crumbs into bottom of pan.
Cut the fleur de sel caramels into small pieces and spread over the bottom layer of the crumb mixture. Sprinkle crust with chocolate chips and pecans then top with reserved crumbs, pressing gently to secure.
Bake for 20-25 minutes or till golden brown. Cool at least one hour before cutting.
2 cups quick cooking rolled oats
1 1/2 cups packed brown sugar
1 teaspoon baking soda
1/4 teaspoon salt
1 cup butter, melted
16 fleur de sel caramels (see recipe below)
2 cups semi-sweet chocolate chips
1 cup chopped pecans
Preheat oven to 350º. Grease 9 x 13 inch pan.
In large bowl, combine flour, oatmeal, sugar, soda and salt. Stir to blend. Add melted butter and mix till well combined. Reserve half the crumbs, about 3 cups. Press remaining crumbs into bottom of pan.
Cut the fleur de sel caramels into small pieces and spread over the bottom layer of the crumb mixture. Sprinkle crust with chocolate chips and pecans then top with reserved crumbs, pressing gently to secure.
Bake for 20-25 minutes or till golden brown. Cool at least one hour before cutting.
Fleur de Sel Caramels
Vegetable oil
1 ½ cups sugar
¼ cup light corn syrup
1 sup heavy cream
5 tablespoons butter
1 teaspoon fine fleur de
sel, plus extra for sprinkling
1 teaspoon vanilla
Line an 8 inch square pan
with parchment paper and brush the paper with oil, while allowing the paper to
drape over 2 sides.
In a deep saucepan combine ¼
cup water, the sugar and corn syrup and bring them to a boil over medium-high
heat. Boil until the mixture is a warm
golden brown. Don’t stir; just swirl the
pan to mix. Watch carefully, as it will
burn quickly towards the end.
In the meantime, in a small
pan, bring the cream, butter and 1 teaspoon of fleur de Sel to a simmer over
medium heat. Turn off the heat and set
aside.
When the sugar mixture is a
warm golden color, turn off the heat and slowly add the cream mixture to the
sugar mixture. Be very careful, it will
bubble up violently. Stir in the vanilla
with a wooden spoon and cook over medium-low heat for about 10 minutes reaches
248 degrees (firm ball) on a candy thermometer.
Very carefully pour the caramel into the prepared pan and refrigerate
for a few hours, until firm.
When the caramels are cold,
pry the sheet from the pan onto a cutting board. Cut the sheet in half. Starting with the long side, roll into one
piece of the caramel up tightly into an 8 inch log. Repeat with the second piece. Sprinkle both logs with fleur de sel, trim
the ends, and cut each log in 8 pieces.
Cut glassine or parchment papers into 4 x 5 inch pieces and wrap each
caramel individually, twisting the ends.
Store in the refrigerator and serve the caramels chilled.
Sunday, November 18, 2012
Fleur de Sel Caramels
I absolutely love caramel!
If you were to give me a choice between chocolate and caramel – the choice
would be a resounding thumbs up for caramel. Still love chocolate, but if had to choose, caramel is the winner. With the explosion of flavored,
salted and burnt caramels – I am in caramel heaven.
Several years ago, I had bookmarked this recipe from Ina
Garten and finally got around to making these delightful caramels. The result was amazing. They were creamy, soft and had a perfect
balance of rich caramel flavor along with the hint of salt from the fleur de
sel - simply sublime.
Yesterday numerous college friends and I celebrated our dear
friend Pam’s milestone birthday. It was
such a remarkable day to be with long time friends and catching up on everyday
life and a bit of gossip thrown in for good measure. Wink.
It still astounds me how fast time is flying by and hearing about
everyone’s kids growing up. Some are heading
off to college while others are still in middle school and high school.
Perhaps it is just my opinion, but I truly believe that
everyone is aging extremely gracefully and life is treating everyone well. Good friends are a treasure. Despite everyone living busy lives, it seems
like yesterday when we are able to get together and spend time with each other.
As a quick preview, tomorrow is the big reveal for the
Secret Recipe Club and my selection will incorporate these fleur de sel
caramels. I brought them to one of my
offices and let’s just say that one person (who will remain nameless) ate over
10 of the delights I made.
These caramels were so simple to make and worthy of being
highlighted for my Simply Sublime series.
Thank you Ina for another foolproof recipe!!
Fleur de Sel Caramels
Vegetable oil
1 ½ cups sugar
¼ cup light corn syrup
1 sup heavy cream
5 tablespoons butter
1 teaspoon fine fleur de sel, plus extra for sprinkling
1 teaspoon vanilla
Line an 8 inch square pan with parchment paper and brush the
paper with oil, while allowing the paper to drape over 2 sides.
In a deep saucepan combine ¼ cup water, the sugar and corn
syrup and bring them to a boil over medium-high heat. Boil until the mixture is a warm golden
brown. Don’t stir; just swirl the pan to
mix. Watch carefully, as it will burn
quickly towards the end.
In the meantime, in a small pan, bring the cream, butter and
1 teaspoon of fleur de Sel to a simmer over medium heat. Turn off the heat and set aside.
When the sugar mixture is a warm golden color, turn off the
heat and slowly add the cream mixture to the sugar mixture. Be very careful, it will bubble up violently. Stir in the vanilla with a wooden spoon and
cook over medium-low heat for about 10 minutes reaches 248 degrees (firm ball)
on a candy thermometer. Very carefully
pour the caramel into the prepared pan and refrigerate for a few hours, until
firm.
When the caramels are cold, pry the sheet from the pan onto
a cutting board. Cut the sheet in
half. Starting with the long side, roll
into one piece of the caramel up tightly into an 8 inch log. Repeat with the second piece. Sprinkle both logs with fleur de sel, trim
the ends, and cut each log in 8 pieces.
Cut glassine or parchment papers into 4 x 5 inch pieces and wrap each
caramel individually, twisting the ends.
Store in the refrigerator and serve the caramels chilled.
Thursday, November 15, 2012
Friday Night Bites | Jalapeno Cheddar Crackers
I pre-ordered the new Barefoot Contessa Cookbook – Foolproof and it
finally arrived last week at my office.
I could hardly wait to browse through all of the recipes to see what I
would make first. After looking through,
the Jalapeno Cheddar Crackers just leaped off the page and those would be the
first recipe.
I have to say that I am not a jealous person, but today I
was. I was browsing facebook today and
saw a few of my co-workers who went to Palo Alto
to attend Ina Garten’s in person book signing.
How cool that they got to meet Ina! If you asked me which celebrity chef I would love to meet and hang out with, it would have to be Ina. I have all 7 of her books and this new one
makes eight. Ina has a knack for making
simple recipes that always come out perfect and taste fantastic. It is only appropriate that her latest book
is titled – “Foolproof”.
I read the recipe over a couple times and decided to double
the jalapeno and substitute the chipotle chili powder for the traditional
version. I found some extra sharp white
cheddar cheese from Trader Joe’s that was simply perfect. I just had to indulge in a slice or two of
cheddar while making the dough.
These crackers are simple, jam packed with flavor and
perfect for the Friday Night Bite series.
You can make the dough ahead of time, then simply slice and bake. You can kick these up a notch by serving a
bit of chili jam along side. A great
wine pairing for these crackers is a crisp Sauvignon Blanc. One of my all time favorites is from KimCrawford from Marlborough , New
Zealand .
It is a high-spirited wine that is overflowing with flavors of pineapple
and stone fruit with a hint of herbaceousness.
On the nose is a spray of citrus and tropical fruits along with a slight
grassy undertone. It is bright, fun and
consistently a perfect Sauvignon Blanc in my book.
Jalapeno Cheddar Crackers
Makes 32 to 34 crackers
2 cups flour
1 teaspoon salt
1/8 teaspoon baking powder
14 tablespoons cold butter, diced
5 ounces extra sharp white cheddar, grated
2 tablespoons minced seeded jalapeno pepper
½ teaspoon chili powder
3 tablespoons ice water
1 egg beaten with 1 tablespoon milk, for egg wash
Fleur de sel or sea salt
Place the flour, salt and baking powder in a food processor
and pulse to mix. Add the butter and pulse until the mixture resembles coarse
meal. Add the cheddar, jalapeno, and
chili powder and pulse again. With the
food processor running, add the ice water all at once. Continue to pulsing until the mixture begins
to form a ball. Dump the dough onto a
floured board and roll it into a 14-inch log.
Wrap in plastic and refrigerator for at least one hour.
When ready to bake, preheat the oven 400 degrees. Line a sheet pan with parchment paper.
Cut the dough in 3/8-inch thick slices. Place the crackers on the prepared sheet pan,
brush with the egg wash, and sprinkle with the fleur de sel. Bake for 12 to 15 minutes, until golden
brown. Serve slightly warm or at room
temperature.
Subscribe to:
Posts (Atom)