Thursday, September 16, 2010

PFB #1 | My Project Food Blog Equation: Food + Wine + Entertaining = Happiness


Excitement, anticipation and curiosity are emotions that are running through my veins right now. Extraordinary opportunities don’t come along every day. One such chance has been presented to food bloggers through Foodbuzz with a unique contest called “Project Food Blog”. As Foodbuzz states, Project Food Blog is the first-ever interactive competition where thousands of Foodbuzz Featured Publishers are competing in a series of culinary blogging challenges for the chance to advance and a shot at the ultimate prize: $10,000 and a special feature on Foodbuzz.com for one year.

The first challenge is aptly titled, “Ready, Set, Blog” – where Foodbuzz is asking each blogger to create a blog post that defines us a food blogger and why we would have what it takes to be the next food blog star. Why are we unique and what sets us apart from everyone else. These are thought provoking questions and do challenge us to think introspectively.


January 2009 I embarked on the blogging journey by introducing my blog, Authentic Suburban Gourmet. It began as a way to chronicle my recipes and share my thoughts and ideas about food, wine and entertaining. Everything would be all in one spot and with the World Wide Web, I would be able to easily share with my friends and family, anywhere and anytime. The name Authentic Suburban Gourmet spawned from being myself and expressing my creativity and thoughts (authentic) through using ingredients and resources that are available most everywhere (suburban) and bringing an elegant, sophisticated touch (gourmet).


My love affair with food began when I was a small child. It was the simple things like homemade tacos, soups and chocolate chip cookies. I remember being so excited when I received my first Easy Bake Oven – I thought – Oh my gosh, I can actually cook my own cakes and cookies. The process of mixing the batter, putting it into those tiny pans and watching it cook by a mere light bulb was so incredibly fascinating. Simultaneously, my Mom would teach me about the basics of cooking with the measuring, reading recipes and the various cooking methods. To this day, I appreciate all of the techniques and information that my wonderful Mom taught me. I am obsessed with bon appetite, food and wine, saveur, the cooking channel, taking cooking classes and checking out the latest gourmet dining spot. Food and wine just facinate me.


{ My beautiful Mom }


{ My good friend Helen and me at Tante Marie Cooking School in San Francisco }

During the day I am a Vice President for a Human Capital Firm which is an extremely rewarding career and I am passionate about being successful. I believe that leading a balanced life is critical for true happiness. This brings me to my title of this blog post – “My Project Food Blog Equation: Food + Wine + Entertaining = Happiness". I am so fortunate to be born and raised in the beautiful San Francisco Bay Area and I have an immense affinity for great food, wine and cherish the art of entertaining. I am lucky to be in close proximity to the wine country, abundant farmers markets, gourmet food resources, and brilliant restaurants. All are resources of inspiration for me. Since I can remember, I have been blessed with the artistic and creative gene. With my passion for food, wine and entertaining, I am able to unleash these qualities and share through my blog.


Sharing my creative food ideas and recipes with other people makes me happy. When I receive a comment on my blog from someone who appreciates what I have created, it puts a huge smile on my face. Just the other day, a friend on facebook sent me a comment that read simply – “I love your blog”. Cooking for other people and knowing that they are enjoying each bite, is blissful. My husband is my biggest fan and was hooked when I prepared a gourmet dinner on our third date. As they say, the rest is history; we just celebrated our 12th wedding anniversary. Planning and executing a dinner or cocktail party exhilarates me. From the inception of an idea to planning the menu to shopping to cooking to setting the table to serving the food to hearing what everyone thinks is pure joy. It brings me much happiness to share my passion with other people and in return it makes them happy.


{ My wonderful husband Charles }

Over the last year and half I have learned so much about blogging, photography, writing, technology, social media, food styling, recipe writing, cooking and myself. Learning is a life long journey which never ends. The journey is just beginning and I look forward to the roads ahead. One of the rewarding aspects of blogging is the people you meet along the way - all wonderful people and sharing with them.


Combining food, wine and entertaining together in one blog gives me the opportunity to share my passions with my friends, family and readers. Being real, creative, passionate and truly obsessed about food, wine and entertaining is one of the reasons that Authentic Suburban Gourmet is unique. I look forward to continuing to share my equation for happiness!


Tuesday, September 14, 2010

Fig Jam Pockets


2010 was the year for me! Learning to can was on my bucket list. I always marveled at my Moms canning skills and love for this art form. Canned peaches and apricots were her specialty along with strawberry jam. During the winter, we would enjoy literally the fruits of her labor.

I took the plunge a few months ago. Did my research, purchased books on canning and collected the equipment. After reading a lot of the books, my biggest fear was that the jars would not seal. Quickly I learned that the process was actually quite simple, straightforward and extremely rewarding. After seeing my kitchen counters filled with all those beautiful jars and hearing that popping sound all the way upstairs in my office, I knew that I had achieved the success that I desired.


My first attempt was dill pickles. At Costco, while in the refrigerated section, where you need a jacket if you are in there for more than a few minutes, I saw packages of miniature cucumbers that were perfect for making dill pickles. They were so inspirational, that I popped two big bags in my shopping cart and five minutes later I picked up two more bags. I thought if I am going to make dill pickles, I am making a large batch. They are just about ready to taste and my husband is dying to check them out. Keep your fingers crossed.

My second canning adventure was fig jam since I am completely obsessed with these little jewels. After enjoying every page of the Thomas Keller Ad Hoc cookbook, his fig jam recipe caught my eye. It was the balsamic vinegar and knowing that when it is cooked, it becomes sweet, intrigued me. Thirty half pints later, my fig jam was complete.


Recently, I was enthused by a post for Rhubarb Hand Pies from fellow blogger Liren at Kitchen Confidante. Her blog is absolutely beautiful and I recommend taking a look.  In addition, another inspiration came from the jam pockets that I pick up at the Farmers Market at the Ferry Building in San Francisco from a wonderful bakery in Healdsburg. It is called the Downtown Bakery & Creamery. My husband absolutely loves these jam pockets and I love the almond tart they make.

I am always thinking about things to make and put on the blog to share with everyone. The stars aligned and the Fig Jam Pockets came to life. My husband said they were the BEST cookie I had ever made. Coming from my number one fan, that meant the world to me.  Enjoy!

Fig Jam Pockets

Makes 24

Pate Sucree (From Martha Stewart)

2 ½ C. Flour
3 T. Sugar
1 C. Butter (2 sticks), chilled and cut into pieces
2 Egg yolks
¼ C. Ice water

Additional

Fig Jam
1 Egg for brushing top of pastries
Course sugar for sprinkling on top

Use a food processor, combine the flour and sugar. Add the butter pieces and process until the mixture is crumbly. Lightly beat the eggs and add to the mixture and pulse until combined. Then stream the ice water into the processor and continue to process until the dough holds together. Remove and divide the dough into two balls and flatten. Wrap with plastic wrap and chill in the refrigerator for at least one hour.

To assemble:

Use a large cutting board and generously flour. Lay one of the disks on the floured board. Place plastic wrap on top and begin to roll out to a thin sheet of dough. You will want to rotate the dough after a few rolls with the rolling pin. Use a square cookie cutter that is 2 inches in diameter or I used a ravioli cutter of the same size.

Each jam pocket will take two pastry squares. Lay one square on the cookie sheet lined with parchment paper or a silpat. Place about 1 heaping teaspoon of the fig jam in the middle. Fill a small bowl with water and use your index finger to dampen the top piece of dough and gently lay on top of the jam filled dough. Carefully press the edges all away around without letting the jam come out. To seal use a fork to press all around the pastry and using a pastry brush, give a gentle wash of the egg on top. Sprinkle with the course sugar.

Bake at 375 degrees for 15 minutes. Remove and let cool on a wire rack. Keep in a airtight container.

Saturday, September 11, 2010

{ New Cult Wine: Leviathan Cabernet Blend }


Wine is one of my passions. I find it intriguing to try new vintages, styles, varietals, regions and different price points. Wine is something that is a very personal thing – meaning what I may enjoy, you may not. Absolutely nothing wrong with having opinions. That is the beauty of wine tasting.

Several years ago I stumbled upon a wine club for the insider. It is called Porthos and was founded in 2000 by three wine aficionados who were dedicated to finding undiscovered small production and boutique wines in the Napa and Sonoma valleys. Today, they do reach beyond these two famous wine regions. Their mission is to provide personalized service, insider connections and insider scoop.


Often an email pops up in my outlook that alerts me to a special find. I read the description and I am hooked. I click the order form, select the quantity and go to the checkout online. Of course my credit card is already stored for easy ordering. It is way too easy these days. A few weeks ago, such an email popped up. It highlighted a more rare to find wine by the one of the most powerful wine couples in Napa Valley, Andy Erickson (Screaming Eagle, Hartwell, Dalla Valle) and viticulturist Anie Favia (Abreu and Screaming Eagle). The wine was a 2008 Leviathan Cabernet Blend from Napa. Knowing that Screaming Eagle is the mother of all cult wines, this was a must purchase. Porthos even sweetened the deal by including free shipping if you purchase six or more bottles. So I did.

Last night, as one of our traditional Friday night evenings, my husband and I had wine and appetizers. I pulled one of the Leviathan bottles from the cellar. The bottle is a sturdy weight with a simple beautiful label. The word Leviathan refers to a monstrous sea creature mentioned in the Old Testament of the Bible. Also, refers to a very large animal, especially a whale. I guess the bottle is synonymous with the meaning.


Leviathan carries a 96 point rating from the wine insiders at Porthos. This wine is a stunning Bordeaux blend of 40% Cabernet Sauvignon, 36% Merlot, 17% Syrah and 7% Cabernet Franc. Aromas jump out of the glass that resemble coffee beans, smoke, leather, dusty rose and black cherry pie. Once you take your first taste, you experience velvet tannins and quickly changes to intense flavors of dark cocoa, raspberries, caramel, ripe cherries and plums. The finish is reminiscent of dark fruit and an ever so slight sweetness.

It is fun to discover and taste the new up and coming wines from the wonderful wine regions of Napa and Sonoma. Leviathan is one of the new cult wines and is sure to have a following of the grand cult wine of them all, Screaming Eagle. My bucket list includes having just a taste of Screaming Eagle one day. If I just click my ruby red slippers three times, surely dreams can come true.

Thursday, September 9, 2010

Fresh Fig and Honey Ice Cream


I scream, you scream, we all scream for ice cream. How many times did you say or hear that when you were a kid? I bet more than you think. My very first job was working at a local ice cream parlor in the Bay Area, called Loard’s Ice Cream. It was one of those old fashioned places that made their own ice cream from pure cream and had great flavors ranging from banana, coffee to champagne sherbet. Of course, all of the standard flavors existed plus seasonal favorites including eggnog and pumpkin.

I worked there for about a year and half and then it was time to move onto the next job. Too much temptation to taste everything there; plus my pants were not as loose as they use to be. It was a terrific first job which taught me organization, customer service and problem solving skills. To this day, I could make any of the various sundaes on the menu – funny how you just don’t forget certain things.


Over the long holiday weekend, my creative juices were flowing. I had the urge on Saturday morning to make homemade ice cream. I had fresh figs – quite frankly I am obsessed with figs this year. I thought the figs would be good in an ice cream, but what else to put with these little treasures. Ah ha - a great compliment would be honey. Now I had my flavor – fresh fig and honey ice cream. Rather than blending the bits of figs in the ice cream while it was being processed, I wanted a more organic texture and experience. After the cream was almost frozen, I blended by hand the bits of fig to give texture and a beautiful appearance when formed into that lovely round sphere of goodness.


On Sunday evening we were invited to our next door neighbors for a rib eye steak dinner with all of the wonderful sides – mashed potatoes, sautéed portabella mushrooms and sautéed zucchini with garlic. It was a great weekend of dining with our great neighbors - one family on Sunday and another on Monday.  We felt very special to have such thoughtful people invite us over.  I always enjoy when dining out or at friends, the experience of being pampered by not actually cooking and someone spoiling me. Don’t get me wrong, I absolutely LOVE cooking for people, but every once in a while, it such a treat to be catered to. I ended up running home to grab the Fig Ice Cream to share with everyone. My scooping skills are still current and everyone enjoyed a bit of homemade goodness.

Fresh Fig and Honey Ice Cream

½ C. Honey
1 ½ C. Heavy Cream
1 ½ C. Half n Half
¼ C. Sugar
1 t. Vanilla
¼ t. Salt
5 Large egg yolks
6 Large fresh figs, stemmed and chopped into tiny pieces

In a medium sauce pan, add the cream, half n half, honey and salt. Cook over medium heat until it is warm. In a separate medium bowl, add the egg yolks and sugar. Whisk until creamy. Take about a fourth of a cup of the warm mixture and add to the egg yolk mixture and whisk quickly to temper the eggs.

Add the egg mixture to the cream mixture and cook on medium heat while stirring constantly, until the mixture thickens and coats a wooden spoon.

Chill the mixture over an ice bath and let chill in the refrigerator until completely cool. Freeze the mixture according to the manufacturer’s instructions. Once it is chilled, the stir in the chopped fig pieces. Transfer to a plastic storage container and freeze until ready to serve.

Monday, September 6, 2010

Mini Red Velvet Cupcakes


Traditionally we think of Labor Day as a symbolic end to Summer. Often celebrated by hosting or attending a party or BBQ. Actually the first Labor Day was observed on September 5, 1882 in New York City by the Central Labor Union of New York. A few years later, in 1894 it became a federal holiday. I like millions of other people across the country look forward to a well deserved day off.

Living in the Bay Area, we typically experience warm months ahead through about the end of October. This year has been particularly mild on the weather front and I hope that many warm days are ahead. Tonight we are headed to one of our neighbors for Labor Day barbeque festivities. I asked ahead of time what I could bring to help out. I offered a side dish or dessert. My neighbors reply over email was – a dessert would be wonderful. Dessert it is!!


Not having an overwhelming sweet tooth, I pondered what to bring that would please both adults and kids. I have long wanted to make red velvet cupcakes and have been facinated by them. Several months ago I picked up Martha Stewarts Cupcakes. I leafed through the index to see if there was a recipe for Red Velvet Cupcakes and I knew that Martha would not let me down. I adapted the cupcake recipe ever so slightly, since Martha creates recipes near perfection.


Adding my own spin, I made mini versions of these delectible little treats. With the frosting recipe, I substituted half of the butter for shortening to make it lighter and creamier. Using a piping bag with a star tip to dress the top of each little cupcake, it added an elegant touch.

I hope that everyone has a wonderful Labor Day Holiday!  Enjoy!!


Mini Red Velvet Cupcakes

Makes approximately 72 cupcakes

2 ½ C. Flour
2 T. Cocoa powder
1 t. Salt
1 ½ C. Sugar
1 ½  C. Vegetable oil
2 Large eggs
1 t. Red gel-paste food color
1 t. Vanilla extract
1 C. Buttermilk
1 ½ t. Baking soda
2 t. Distilled white vinegar

Preheat oven to 350 degrees. Line mini muffin tins with paper liners.

With an electric mixer on medium-high speed, whisk together sugar and oil until combined. Add eggs, one at a time, beating until each is incorporated, scraping down sides of bowl as needed. Mix in food color and vanilla. Add flour, cocoa powder and buttermilk slowly and alternate a bit at a time until incorporate. (if you don’t have buttermilk, add about 1 teaspoon of vinegar to the milk and let stand for 5 minutes)

Stir together the baking soda and vinegar in a small bowl (it will foam); add mixture to the batter, and mix on medium speed 10 seconds.

Using a small ice cream scoop, filling each three-quarters full. Bake, rotating tins halfway through, until a cake tester inserted in centers comes out clean, about 12 minutes. Transfer tins to wire racks to cool completely before removing cupcakes. Cupcakes can be stored overnight at room temperature, or frozen up to 2 months, in airtight containers.

To finish, use a piping bag with a star tip to frost each of the cupcakes. Refrigerate up to 3 days in airtight containers; bring to room temperature before serving.

Cream Cheese Frosting

½ C. Butter
½ C. Shortening
1 t. Vanilla
1 (12 oz) package cream cheese
1 lb. Confectioners sugar

Bring the butter and cream cheese to room temperature. In a stand up mixer, cream together the butter and cream cheese until fluffy. Add the vanilla and beat for 15 seconds. Slowly incorporate the confectioner’s sugar until the entire amount is combined. Beat until fluffy – for about 3 to 5 minutes. Use a piping bag and star tip to decorate each mini cupcake.


Friday, September 3, 2010

Simple Heirloom Tomato Pasta Sauce


Last night was the beginning of my mini vacation. I am sure many of you are working super hard and long hours. Getting a break to just relax and unwind is so welcoming. I did not have a ton of energy to create an elaborate meal, so I pursued my refrigerator and found the bag of heirloom tomatoes that our friend brought from her garden. Since they were just on the brink of turning too soft to use in a salad, I thought the flavors would be perfect for a quick pasta sauce.


This sauce is not elaborate or complicated, just plain simple but packs a big punch of flavor. The key is to season it well and cook just long enough to form the traditional flavors. I tend to let it cook until the liquid begins to thicken and then it is perfect. I guess if you got impatient, then you could add a tablespoon or two of tomato paste to hurry it along.


During the day an email popped up on my computer and it was titled “Feng-Shui (read – please don’t delete)". Being a curious person and knowing that it was from a trusted friend, I had to open it up and read it. Typically when I get these, I glance and delete. However, this one was different and the message inside really resonated with me and I wanted to share it with all of you. Really basic stuff, but sometimes we get moving so quick with our daily lives, that a little reminder every once in a while is just what we need. Enjoy.
  • Give people more than they expect and do it cheerfully
  • Marry a man/woman you love to talk to. As you get older, their conversational skills will be as important as any other.
  • Don't believe all you hear, spend all you have or sleep all you want
  • When you say, 'I love you,' mean it.
  • When you say, 'I'm sorry,' look the person in the eye
  • Be engaged at least six months before you get married
  • Never laugh at anyone's dreams. People who don't have dreams don't have much.
  • Love deeply and passionately. You might get hurt but it's the only way to live life completely.
  • In disagreements, fight fairly. No name calling.
  • Don't judge people by their relatives.
  • Talk slowly but think quickly.
  • Remember that great love and great achievements involve great risk.
  • When you lose, don't lose the lesson.
  • Remember the three R's: Respect for self; Respect for others; and Responsibility for all your actions.
  • Don't let a little dispute injure a great friendship.
  • When you realize you've made a mistake, take immediate steps to correct it.
  • Smile when picking up the phone - the caller will hear it in your voice
  • Spend some time alone.


Simple Heirloom Tomato Pasta Sauce

1.2 Lb. Heirloom Tomatoes, stemmed and diced
1 Small White Onion, fine dice
2 T. Olive Oil
3 Garlic Cloves, minced
Salt and pepper
1 Package (8oz) Linguine Pasta (Trader Joe’s Spinach and Chive)

Over medium heat add the olive oil and onions and sauté until translucent. Add the heirloom tomatoes and cook for about 10 minutes over medium heat then add the minced garlic. Season with salt and pepper and continue to cook for another 15 to 20 minutes on medium low heat. The flavors will combine and the sauce will begin to thicken.

Boil the linguine according to the package instructions. Drain and either add to the sauce or spoon the sauce over the noodles. Garnish with parmesan cheese.


Wednesday, September 1, 2010

Deviled Eggs with Crab and Chipolte Aoili


Deviled eggs – were they considered evil at one time, hence the name? Why not call them heavenly eggs? I found out they originated way back in ancient Roman times and then spun off to other parts of the world. These popular little gems even have their own special serving trays in all sorts of shapes, colors and sizes. What an honor for these little two bite wonders, to have their very own dish especially created just for them.

I must admit that for years I relied on the deviled eggs that my Mom would make. Still not sure what she exactly puts in there, but they are the best ones I have had. She will make them especially for my husband on occasion, since he loves them so much, especially the ones she makes.


Over the years, I have developed my own recipe for these little tiny bites of joy. I am sure there is a cookbook out there that is all about deviled eggs and if there is not, then someone needs to create one. One of my account executives told me that he had deviled eggs over the weekend that were mixed with finely minced crispy bacon and cheddar cheese. It was piped into the egg halves – almost a take on the baked potato. Imagine it topped with a bit of crème Fraiche and minced chives. A perfect bite or two of wonderfulness!


I am not typically one to get too freaked out with all of the media and the food concerns. With the recent egg concerns, I have been purchasing organic brown eggs that are locally produced. While at the grocery stores, I have noticed that the eggs are still flying out the door and brown eggs seem to have risen in popularity.

Would love to hear about your creative deviled eggs recipes!


(Chives from my garden - love the chive blossom)

Deviled Eggs with Crab and Chipotle Aioli

Eggs

8 Hard boiled eggs
4 T. Mayonnaise
1 T. Dijon mustard
¼ t. Salt

Hard boil the eight eggs and let cool to room temperature. Cut in half lengthwise and remove the yolk. Place into a bowl and break up with a fork until lumps are gone. Add the mayonnaise, mustard and salt. Whisk with a fork until creamy. Taste and adjust seasoning if desired. Chill for one hour.

Chipotle Aioli

½ C. Mayonnaise
1 T. Chives, finely chopped
1 Garlic clove, finely minced
½ t. Lemon juice
1 large Adobo chili
Salt and pepper

Add all of the above ingredients into a food processor until smooth. Taste and adjust seasoning as desired. Place into a container with a lid and refrigerate until ready to use.

Toppings


1/3 C. Crab, lump meat
1 T. Chives, minced

To assemble:

Place the egg halves onto a platter. Put the egg yolk mixture into a piping bag and use the star tip to pipe into the egg halves. Once you have that complete, then top each one with a pinch of crab. Then add a tiny dollop of the chipotle aioli and garnish with a small pinch of chives. Refrigerate until ready to serve.

Monday, August 30, 2010

Homemade Cocktail Sauce


Several weeks ago my husband and I ventured to Costco for various items that we needed. As with our trips to this giant warehouse store, I always find things that were not on my mental list, but I must have. I tend to always pick up in the refrigerated section, lump crab meat that is already packaged. It is produced from Chicken of the Sea and is a 16 oz. vacuumed sealed package of jumbo lump pasteurized crab meat. It has a long shelf life and tastes like it was picked the day before. So incredibly sweet and no fishy taste.

Typically I always purchase the cocktail sauce from the grocery store and it tastes great. I thought I would challenge myself to create my very own cocktail sauce. After quite a bit of research, I found the ingredients and determined my allotments of measurements. I tasted it and then added a bit more of a few items. The outcome was virtually the exact tasting sauce that came from the jar. We watched “Real Housewives of D.C.” that was on TiVo, while enjoying this decadent treat.

Dungeness Crab with Homemade Cocktail Sauce

Cocktail Sauce

½ C. Heinz Chili Sauce
1/3 C. Ketchup
1 T. Horseradish Sauce
2 t. Worcestershire Sauce
¼ t. Salt
1 T. Fresh squeezed lemon juice
¼ t. Cayenne pepper

Add all of the ingredients to a small bowl and stir together. Let sit for about 1 hour in the refrigerator prior to serving.

Use fresh or Jumbo Lump Pasteurized Crab Meat (16 oz.) from Chicken of the Sea.

Simply place as much crab meat as desired on each serving dish and spoon on top the homemade cocktail sauce. Garnish with chives. Enjoy.

Saturday, August 28, 2010

Quinoa, Corn, Avocado & Heirloom Tomato Salad Sherry Vinaigrette + Maybach Wine


Friday night. One of my favorite evenings – the work week has come to a close, the beginning of the weekend is starting and it means relaxation for two days. Last night my husband and I had a dear friend over for dinner. As with our Friday night traditions, it is enjoyed with a good bottle of wine and delicious food. Our friend brought over an exceptional bottle of wine. It is one that I have never heard of before, but I had heard of the exceptional product that they make. The wine is Materium and produced from Maybach Family Vineyards.

Wilhelm Maybach came from humble beginnings as a trainee in a German orphanage. He went on to invent the high-speed internal combustion engine and in 1901, as chief engineer and business partner to Gottlieb Daimler, design and build the first Mercedes cars. For one hundred years, the name maybach has been associated with quality at the finest level.


They created the wine in the same fashion to honor their heritage. The wine is from a single hillside vineyard above the Silverado Trail which produces a deeply concentrated Cabernet Sauvignon. It has undertones of cedar, oak, smoke and rich deep berry fruit. The aromas and flavors were memorizing and it was a perfectly executed Cabernet.


Earlier in the day, I took a client to lunch at Bocanova in Oakland’s Jack London Square. This restaurant celebrates the flavors of South, Central and North America. Each time I eat there, I enjoy the Quinoa salad and it is different each time. Quinoa is pronounced - "Keen - Wa". I duplicated the Quinoa, Corn, Avocado & Heirloom Tomato Salad with Sherry Vinaigrette. We enjoyed a flat iron steak with Montréal steak seasoning that my husband cooked on the grill. A great Friday night and kick off to the weekend.


Quinoa, Corn, Avocado & Heirloom Tomato Salad—Sherry Vinaigrette

1 C. Quinoa
3 Cobs of corn, remove corn kernels
1 C. Heirloom tomatoes, cut into quarters
2 Avocados cut into cubes
½ C. Olive oil
2/3 C. Sherry vinegar
1 large handful of arugula
Salt and pepper

Cook the quinoa according package and let cool. In a large bowl, add the corn, tomatoes and avocado along with the quinoa. Sprinkle on top the olive oil and sherry vinegar and toss. Season with salt and pepper and taste to determine the proper levels. Adjust the olive oil and vinegar is needed. Lastly add the arugula and toss. Serve in a large bowl or individual.

Tuesday, August 24, 2010

Mango and Macadamia Chicken


Last week I attended an event at the new Lafayette Library where Martin Yan, of “Yan Can Cook” came to help raise money for the library. Yan Can Cook was founded in 1977 by Master Chef Martin Yan. He is a champion of Asian cuisine and culture. His cooking shows are known around the world and shown in over 50 countries. He has published twenty eight cookbooks, designs cookware, consults on tourism and owns restaurants. Martin Yan is one of the busiest people I have met.

He amazed us with his humor, talent and enthusiasm for food. His knife skills are mind-boggling with the speed and accuracy. He cut a one or two inch cucumber into 64 slices – in a word – impressive. His story telling and humor is what captured my attention. He loves to get the crowd engaged and laughing.

To start the event, he asked questions of the audience and gave away some of his signature goodies. My friend Monica and I worked as a team to answer one of the first questions correctly about the three things that are important when stir-frying. Okay – I know you want to know what they are: (1) a very hot pan (2) cut the ingredients into fairly uniform sizes to create even cooking time and (3) use vegetable oil or one with a high smoke point to cook the meat. He gave us a cutting board that was made out of rice husks. Whoever figured out how to do that was very ingenuous.

Chef Yan was very generous and brought samples of his food for everyone and there was a crowd of over one hundred plus folks. Of course, he has his products available for sale and of course being a collector of cookbooks, I purchased one. The special thing was that he was on hand to personally autograph the cookbook. I seized the moment and had Monica snap a photo with Chef Yan and myself. What a fun night!


The Mango and Macadamia Chicken is from the cookbook Martin Yan Quick & Easy that I purchased that night. I ever so slightly adapted the recipe and enjoyed it the other night. I would recommend adding chunks of onions to kick up the flavor. Enjoy.

Mango and Macadamia Chicken

Marinade
2 t. cornstarch
2 t. soy sauce

¾ lb. boneless, skinless chicken breast, cut into ½ inch cubes

Sauce
1/3 C. chicken broth
1 T. fresh lemon juice
2 t. rice wine
2 t. sesame oil
1 ½ t. sugar

Cooking items
2 t. vegetable oil
2 cloves garlic, minced
½ t. red chili flakes
1 t. cornstarch, dissolved in 1 T. water

2 mangos, peeled, pitted and cut into cubes
1/3 C. chopped macadamia nuts

To create the marinade, combine the cornstarch and soy sauce together in a bowl and stir well. Add the chicken and coat well with the marinade. Let sit for at least 10 minutes.

To make the sauce, add all of the ingredients together and stir well. Set aside.

Place a wok or stir fry pan on high heat until hot. Add the oil and swirl around. Add the chicken and stir until it is no longer pink in the center. Add the garlic and red pepper flakes and cook for 30 seconds. Add the sauce along with the cornstarch with water. Continue to stir and the sauce will thicken. Add the mango and stir. Transfer to a large bowl and sprinkle the macadamia nuts on top. Serve immediately.


Sunday, August 22, 2010

Cranberry - Orange Crumb Bars


After many months in the box, I finally took out my birthday present from my hubby. Today was the day that I graduated from the minor leagues to the majors. I went from using my long time cherished friend, the Olympus “point and shoot” to what I call, my “big girl camera”. Back in June, my husband gave me a Sony a300 DSLR camera for my birthday. I guess with being so busy and use to my current photo taking habits, I did not get around to opening the box until today.

My hubby, who has done photography for a hundred years, was my personal teacher today. He went through the basics of the camera and how to take a basic photo. Today was lesson number one and I can hardly wait for lesson number two. Oh my gosh, what fun it was to hear that fast clicking noise and zooming in and out to grab the perfect photo. When I loaded the memory card to my computer and viewed the photos of the Cranberry - Orange Crumb Bars, I almost could not believe my eyes – the photos were so much more crisp, vivid and beautiful. So much more to learn, but I feel that I am now on my way.  Today is a great day!

Now onto these wonderful Cranberry – Orange Crumb Bars. You are probably thinking how does she have cranberries in August? Back in the late winter, I purchased three or four bags of fresh cranberries and froze them. I wanted to be able to enjoy these tart little nuggets year round. I saw a recipe on All Recipes for blueberry crumb bars and decided to make them my own. As you can see, the foundation is the same but the entire bar is unique. If you do not have frozen cranberries, try blueberries, blackberries or raspberries. They turned out beautifully and will be on my holiday treat list of things to make.


Cranberry – Orange Crumb Bars

Crumb Mixture
1 C. Sugar
1 C. Butter
1 t. Baking Powder
½ t. Salt
2 t. Vanilla
1 Egg
3 C. Flour
Zest of one orange

Filling
3 C. Fresh/Frozen Cranberries
1 T. Cornstarch
½ C. Sugar

Preheat oven to 375 degrees

In an electric mixer, cream the butter together until smooth. Add the sugar, baking powder, salt and vanilla and cream together. Then add the egg and beat until combined. Add the zest of the orange and mix. Slowly add the flour one cup at a time until combined. Mixture will be crumbly.

Use a 9 x 13 pan and spray with non-stick cooking spray. I use the Crisco one with flour and oil. Divide the mixture in half and spread the first half on the bottom of the pan. It will be thin.

In a medium bowl, add the cranberries and cornstarch together and combine. Spread over the pan with the pressed crumb mixture. Sprinkle the ½ cup of sugar over the entire pan. Take the remaining crumb mixture and sprinkle over the top, leaving small areas where there is no crumb topping.

Bake for 40 to 45 minutes until golden brown. Remove from oven and let cool. Cut into desired sized pieces.


Friday, August 20, 2010

Mushroom, Corn and Grape Tomato Trottole Pasta


What a busy week for me - working a million hours, scheduled events after work and keeping up on house hold tasks. Perhaps this resembles your week. Does anyone remember the Enjoli Perfume commercial? It played a role in the feminist idea we all now know as "having it all." It celebrates a woman who can bring home the bacon, fry it up in a pan, and "never let you forget you're a man". Check it out on You Tube and it will make you giggle.

I came home last night from a work event around 8:30 pm and whipped up dinner for my hubby. I think he was in shock that I went to so much trouble so late at night and after a work event. In reality, this was pretty simple – just appeared complicated.

Went in to the refrigerator and pulled a few items together to create - Mushroom, Corn and Grape Tomato Trottole Pasta. We watched America’s Got Talent, the You Tube show and he kept commenting how delicious the pasta dish was. He is always amazed how I can cook something so quickly with flavor and he said it is one of the many reason he loves me. Awww.


Mushroom, Corn and Grape Tomato Trottole Pasta

8 oz. Baby Bella Mushrooms
3.2 oz. Oyster Mushrooms
3.2 oz. Shitake Mushrooms
4 T. Butter
2 T. Olive oil
4 Ears Corn, cut off kernels
1 C. Grape tomatoes
1 Garlic clove, minced
Chicken stock
Parmesan Cheese
Salt and pepper
1 lb. Dried Pasta

Boil water and cook the dried pasta to desired doneness. Drain and set aside for minute prior to adding to the cooked mushroom, tomato and corn mixture.

Stem and cut the mushrooms into desired pieces. Use a large skillet, heat the butter and olive oil together on medium high heat. Add the mushrooms and cook until golden brown. Add the garlic and cook for one minute. Next add the tomatoes and corn. Cook for another minutes. Add about ½ cup of chicken stock and season with salt and pepper. Add the cooked pasta and toss well together. Taste for seasoning and adjust. Add more chicken stock if too dry. Add about ½ cup of parmesan cheese and toss together.

For serving, either dish into individual bowls and garnish with more parmesan cheese or serve in a big bowl with the parmesan on the side for folks to add on their own.


Tuesday, August 17, 2010

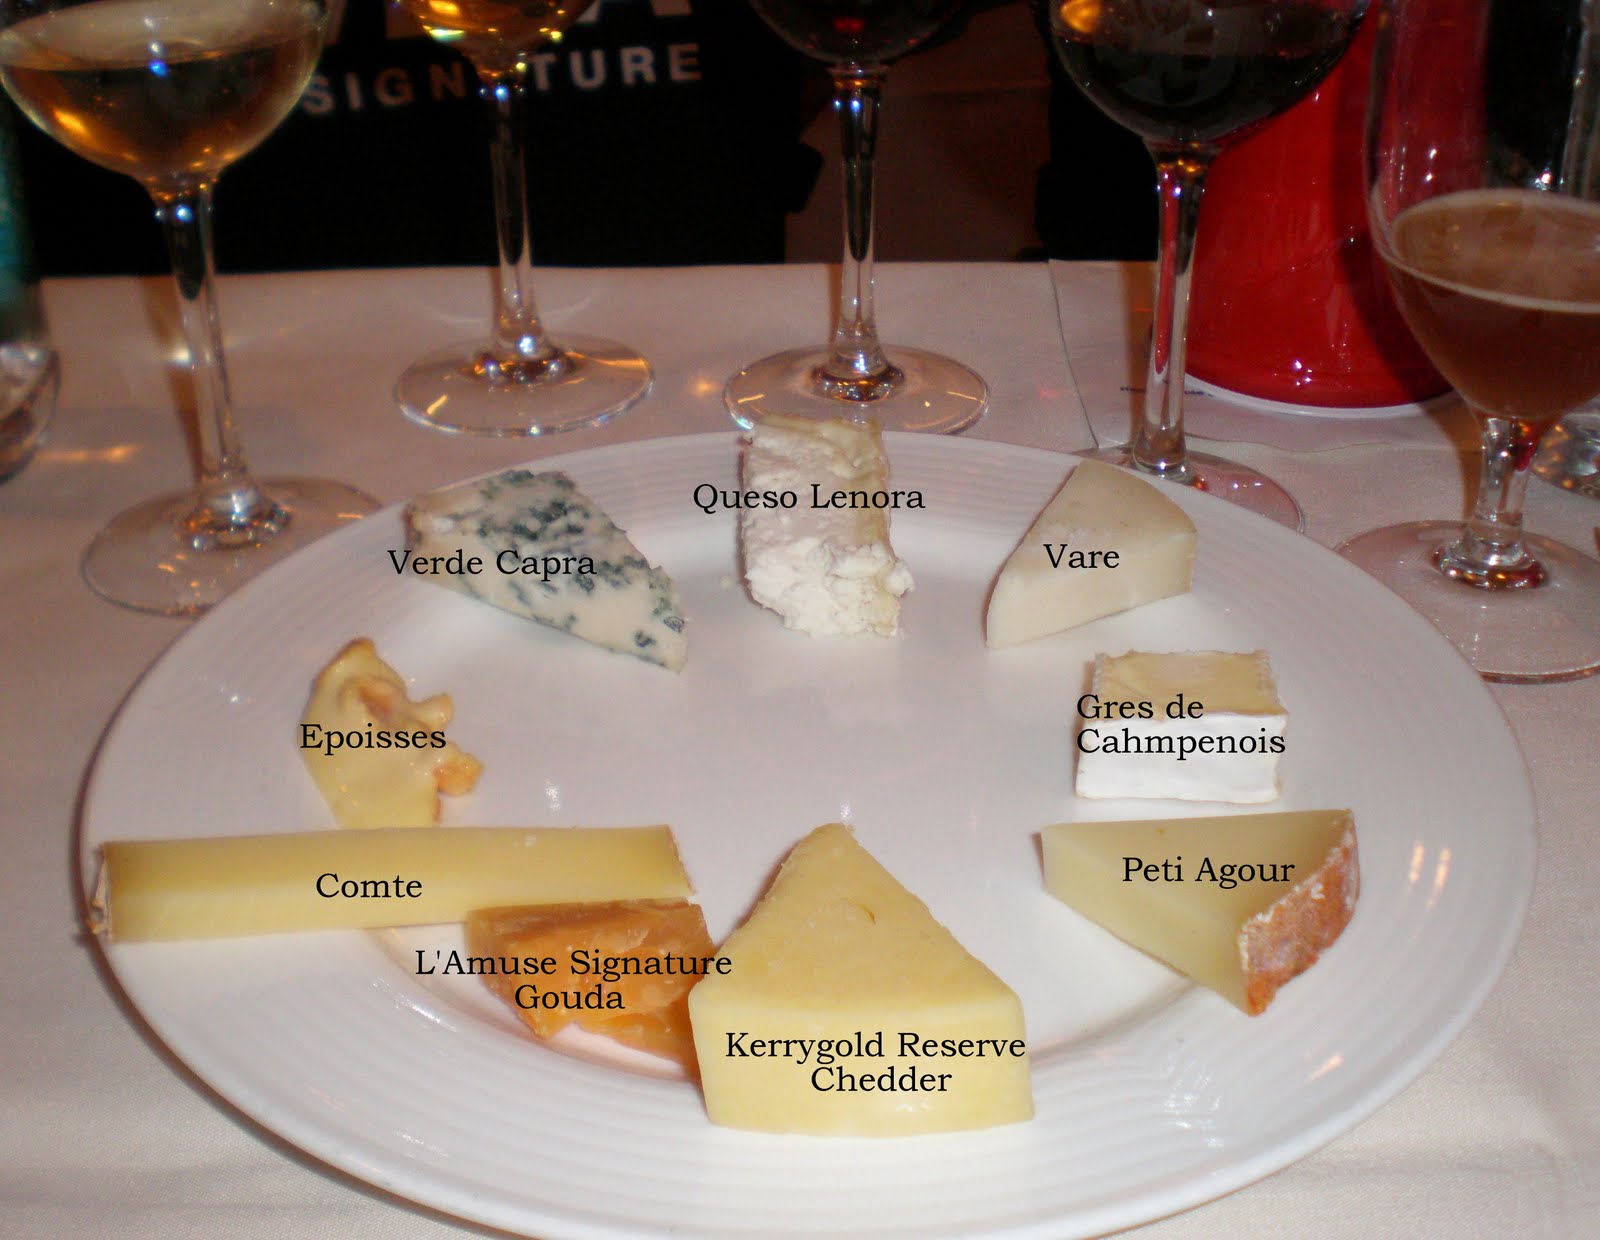
SF Chefs 2010: Slam Dunk Cheese and Wine Pairing


SF Chefs 2010 is an exciting event held in San Francisco. It features San Francisco’s premier food, wine and spirits and is produced by the Golden Gate Restaurant Association. Visa Signature offers discounts and access to special events throughout the event. My long time friends and fellow foodies, Monica and Jeanna  along with myself, attended the “Slam Dunk Cheese and Wine Pairing” seminar yesterday that we had signed up for a while ago. The seminar featured Laura Werlin, a well-known expert on all things cheese. She was accompanied by Karl Wente, fifth generation winemaker from Wente Vineyards in Livermore, which is approximately 45 minutes from San Francisco. To round off this impressive panel was Christie Dufault, who is the sommelier from Michael Mina’s RN74 in the millenium towers.


{ Me, Monica and Laura Werlin }

We rode over on BART bright and early to allow enough time to grab a latte up the street from the Westin St. Francis where the seminar was being held. Monica quickly spotted Chris Constantino from Incanto and Chef vs City whizzing through the revolving doors to get the Anolon Chef Challenge with Jennifer Biestly against Tyler Florence and Elizabeth Falkner. On another side note, after the seminar, we enjoyed lunch at Scala’s and Elizabeth Falkner got seated right after we did. She is the owner of Citizen Cake in San Francisco and is an amazing chef who does both sweet and savory. The seminar room was set up beautifully with plentiful cheese plates, five glasses of wine and one glass of beer. We will get to the beer a bit later. Being Visa Signature clients had its advantages since we enjoyed phenominal seats.


{Karl Wente, Me and Monica }

The impressive panel introduced themselves along with their credentials and then the journey through a cheese and wine paradise started. The seminar focused on “old world cheeses and new world wines”. Wines from the united states and cheese from Europe. It was ten in the morning and wine doesn’t typically appear for me that early, unless it appears in the form of a mimosa. We had our tasting note sheet in hand and were ready to learn.

If you do not already own Laura’s book, I would highly suggest you add this to your collection. As part of the seminar, we received a signed copy of her book.  The information is invaluable and she makes understanding the world of cheese simple. One of the most important things to realize when enjoying wine and cheese together, is to understand that “what rose (grew) together pairs together”. Taste your wine first, then the cheese and then together. You will appreciate each one alone and then how they marry together.


We began with Queso Lenora which is a goats milk cheese from Leon in Spain and paired it with the 2009 Wente Vineyard, Sauvignon Blanc, Louis Mel from Livermore Valley. Goat cheese and Sauvignon are one the most natural and perfect pairings. The wine is fresh, lively and has hints of minerality. The acidity, peach, delicate floral and grassy qualities marry with the goat cheese. Our second cheese was a goat cheese called Vare from Asturias Spain. Different from the first one, it has a slightly grainy mouth feel along with a nutty and creaminess. We paired it with the Sauvignon Blanc and the 2008 Wente Vineyards Riva Ranch Chardonnay. The chardonnay is “fruit on a pedestal” and has an addition of 3% Gewürztraminer. The butter and oak qualities of the chardonnay balanced this goat cheese and were a marriage for your mouth and senses.


{ Labeled the cheeses that we tasted clockwise beginning at twelve o'clock }

Gres de Champenois from Champagne France was our third cheese and had the addition of crème fraiche. This cheese was magic. Enjoying this creamy and rich cheese with the rind, adds a harmony to the cheese along with pairing it with the chardonnay. Switching the chardonnay for a sparkling wine would be a great alternative to the chardonnay. Next we tasted a sheep milk cheese called Petit Agour from Pyrenees (Basque region) in France. It was a very earthy and savory cheese with a similar look of manchego. The outside of the rind is brushed with paprika when creating this lovely cheese. It will often produce a shiny look on the outside due to the milk fats coming to the top as it comes to room temperature.

The Petit Agour was paired with the 2008 Zarzuela from Murrieta’s Well in Livermore. My husband and I actually got married at Murrieta’s Well and will celebrate our twelve year wedding anniversary next month. The Zarzuela is an expressive wine with hints of cherry, spice, cranberry and ripe blueberry on the note and palate. A splash of crushed black pepper comes through along with orange blossom. As it opens up, the wine is even more delicious. As Christie said after tasting - "it is need I say, another slam dunk" and she was right on the mark.


Now for one of the more unique pairings we had. Kerrygold Reserve Cheddar, a cows milk from County Cork in Ireland was paired with Telegraph Brewing Company's California Ale from Santa Barbara. The smooth aged flavor of the cheddar along with the barley and hops from the beer made this a natural pairing. The beer accentuated the cheese profile and was quite a nice pairing. We paired this with another wine, the 2007 Domaine Chandon Pinot Meunier from the Carneros region in Napa. This wine has such delicate fruit flavors with plum and cherry. It was quite angular on the mouth with an elevated acidity and a ting of white pepper flavors came through with this quite versatile wine.
Our next cheese was L'Amuse Signature Gouda which is a cow's milk from Beemster Holland. The flavor in this cheese was incredible and quite unique. Notes of coffee, butterscotch, burnt caramel, cocoa and slight whiskey tones came through. Since being aged, it develops slight crystals and a very hard texture. We tried it with the chardonnay and then the Pinot Meunier. As Carl noted, it was an intellectual process and quite a conundrum between the pairing of the chardonnay and the cheese.

Winding down our tasting, we enjoyed a Comte (Marcel Petite Fort St. Antoine) from Jura France which we paired with the chardonnay. This cheese is only made during specific times of the year and the wine brings out the nutty, creamy and spicy flavors of the cheese. Christie made a great statement about this pairing - "This wine is the cheese's wing man". One of my favorite cheeses was next on the tasting menu. Epoisses (Fromagerie Berthaut) from Burgundy France is a wash rind cows milk cheese. If you enjoy Redhawk from Cowgirl Creamery or Taleggio from Italy, you will savor this cheese. It is a quite pungent and stinky cheese, but oh so delicious. It possesses a saltiness and creamy texture. We paired it with both the chardonnay and the pinot meunier. The chardonnay was the clear winner for me with this pairing.

Last but not certainly least, we had a Verde Capra from Lombardy Italy and is a goat blue cheese. This cheese is profoundly flavorful and intense. A true powerhouse in the cheese family. It was paired with a Zinfandel Port from Peltier Station in Lodi. As in the true Zinfandel style it was jammy and had red raspberry and black cherry undertones. The pairing was spectacular and the contract of the salty, rich cheese with the sweet acidity of the wine was perfect - dare I say, another slam dunk. A special note, we had beautiful sliced baguettes to enjoy our cheese and some of the most divine artisan breadsticks from Panevino.

Overall it was a wonderful day spending with my foodie friends, geeking out on talking about food along with tasting some amazing cheeses and wines. As with other classes, I am building on my food and wine knowledge and loving every minute. The goal for next SF Chefs is to spend the weekend in the city and attend a large number of the events.


Sunday, August 8, 2010

Wild Mushroom Crostini + Giveaway Winner Announced


As promised, I would announce the winner of the giveaway from the Crostini Challenge blog post on July 29th. First, I wanted to determine my method for randomly picking the winner and my husband was out with the "boys" today, so there went that idea. Then I thought, Max my Lasha Apso was a perfect choice.

I proceeded to write all of the participants names on small pieces of paper and folded them up. I grabbed my camera, the folded pieces of paper and Max. Quickly tossing them on the carpet, I followed Max to the first piece that he went to eat and then the winner was chosen. Pretty cleaver way to pull the winner, huh?


With that, I would like to announce the winner……………drum roll please………………I would like to congratulate Jean from Lemons and Anchovies. Jean – please email me the address that you would like me to send the Bruschetta book to. Congratulations!!

The foodie community is comprised of such talented and creative people. I enjoyed hearing everyone’s ideas and wanted to highlight a few. First, Lindsay from Love and Olive Oil shared Green Bean and Garlic Scape Bruschetta. If you have not visited her site, I would recommend it highly. She is a very talented gal with wonderful ideas and photography.

Next I enjoyed hearing from Sara at CaffeIna who said the best one she has ever eaten was with goat cheese and grapefruit jam. That one sounds absolutely amazing and unique – a must try indeed! Check out Sara’s blog for tasty baked treats that will make your mouth water.

Kate from Kate is Cooking shared her recipe that her daughter in law brought to Thanksgiving dinner for Garlic Shrimp Crostini. It looks simple but packed with flavor. Aren’t those the best kinds of appetizers?

Gina and Robbyn from What’s for Dinner Across State Lines shared a great idea for a Crostini. “I like to make them on sourdough baguettes with sun dried tomato pesto, mascarpone cheese, a little arugula, bresaola (dried cured beef) and a drizzle of extra virgin olive oil!” Give a peak to Kate and Gina/Robbyn’s blogs!

Here is another Crostini that is one of my favorites and simple to make. It is Wild Mushroom Crostini and you can mix up the combinations of mushrooms to your taste. The addition of thyme and crème Fraiche add a delicate finish.

Wild Mushroom Crostini

3 C. Assorted wild mushrooms, finely chopped
1 Shallot, minced
2 t. Fresh thyme leaves
3 T. Butter
1 T. Crème Fraiche
5.2 oz. Boursin Cheese, garlic and fine herbs
Salt and Pepper
Baguette, sliced thin and toasted golden brown (about 24)

In a large skillet, turn the heat to medium high and add the butter. Let melt and be careful not to burn. Then quickly add the mushrooms & shallots and cook for about 5 minutes until golden brown. Add salt and pepper along with the thyme leaves. Cook for one minute. Take off the heat and stir in the crème Fraiche. Spread about two teaspoons of the boursin cheese on the crostini and spoon about one tablespoon on each toasted baguette and serve.

Wednesday, August 4, 2010

Grilled Cheese Sandwich with Braised Short Ribs


Leftovers – what to do with them? Do you bring them to work the next day for lunch or serve it again the following night? Typically I am not a huge fan of leftovers, except for those dishes that actually get better with time. You probably can think of one or two dishes in which it actually develops better flavor profiles over night. The Guinness Braised Short Ribs is one of those dishes, actually most braised short rib or similar dish will be better the next day. Made them over the weekend and the next night used them again for this sandwich.

Ever since the new cooking channel hit the airwaves and replaced the fine living network, I have been completely addicted. Is anyone else in love with this new channel? The shows are fresh, unique and geared towards the true foodie. Some of my new favorites are: Unique Eats, Foodography, Chucks Day Off and Food Crafters. One of the episodes of unique eats was called “hand held foods” which profiled a “taco truck” that specialized in grilled cheese sandwiches. Some of the combinations were amazing and such a unique idea. The one tip I took away was to use a combination of butter and mayonnaise to spread on the bread – it prevents burning.

Loving grilled cheese sandwiches all my life plus the inspiration of the grilled cheese truck inspired me to use the leftover Guinness braised short ribs in a grilled cheese sandwich. The result was amazing! Would love to hear about any unique “grilled cheese sandwiches” that you have had.

Grilled Cheese Sandwich with Braised Short Ribs

Sliced French Bread (Sandwich style)
Sharp Cheddar Cheese, deli slices
Guinness Braised Short Ribs, shredded
Caramelized Onions
Butter

Caramelized Onions

1 Large onion
2 T. Butter

Peel and slice ¼ inch thick slices of the onions. In a large skillet, add the butter and let melt over medium heat. Add the onions and toss well in the melted butter. Let cook on medium to medium low for 20 to 25 minutes or until onions are a caramel color. Let cool.

To assemble:

Butter each side of the bread with either butter or the combination of butter and mayo. Place a slice of cheddar cheese on each side. Put some caramelized onions on one side and add the shredded braised short rib on top of the onions and then top with the other slice of bread. Grill on medium heat for about 5 minutes per side. Cut in half and serve. A quick tip: heat the left over braised short ribs first and then shred and prepare the sandwiches.

Monday, August 2, 2010

Guinness Braised Short Ribs


I love Saturdays. It means it is right in the middle of the weekend and don’t have to worry about getting geared up for the work week ahead. A pure day of relaxation on that front. This Saturday I brought Max down early to the doggie spa to get his every 7 week grooming regimen complete. I always tell him that he will get to spend the day with all of his little and big doggie friends – not sure if he really cares, but it makes me feel good.

Stopped by Trader Joes to pick up more figs to make more fig jam. I hit the jackpot with the fig quantities by filling a carry basket with a dozen, one pound containers of wonderful figs. Ended up making 30 jars of jam. Started this canning craze the weekend prior with handmade dill pickles – a future post indeed. Always watched my Mom can when I was little and it was on my bucket list of things to complete – I guess I can now check that off the list. More canning adventures to come for me.

We decided to have a couple friends over on Saturday night. Even though it is summer, braising is such a wonderful way to entertain. You literally cook a few things, throw all the ingredients into a large pot, turn the oven on and go on with the rest of your day. The result is pure decadence with intense flavors and ultra tender meat that is fork tender and no knife is required.

Typically I use my “go to” recipe of Asian Braised Shortribs with Orange Hoisen Sauce, but wanted to try something new. On a trip to Ireland several years ago, we toured the Guinness Factory and it was quite facinating. Came up with my version of Guinness Braised Short Ribs and served it with Israeli Couscous. Once the couscous was cooked, I tossed with a splash of good olive oil and seasoned with salt and pepper. A bit lighter than using mashed potatoes. The dish turned out incredible.

Guinness Braised Short Ribs

8 to 12 Boneless Shortribs
1 pound carrots, diced small
2 medium onions, diced small
2 bay leaves
8 tablespoons tomato paste
3 cloves of garlic, minced
4 sprigs fresh thyme
4 sprigs fresh rosemary
4 cups Guinness
4 cups beef broth
3 tablespoons olive oil
1 tablespoon salt
2 teaspoons black pepper

Preheat oven to 325°F.

Use a 6 quart oven proof pot with lid. Season ribs with salt and pepper. Heat olive oil over medium heat in pot until hot but not smoking. Add ribs and brown on all sides, about 1 minute per side. Transfer meat to a large plate and set aside. In the same pot add carrots, onions, and sauté over medium low heat until vegetables soften, about 10 minutes. Add garlic, thyme, rosemary and sauté, until garlic softens about 2 minutes. Stir in tomato paste and cook for 1 minute. Add broth and beer, then ribs and bring liquid to a boil uncovered. Cover pot and transfer to the oven, braise until meat is very tender 5 hours.